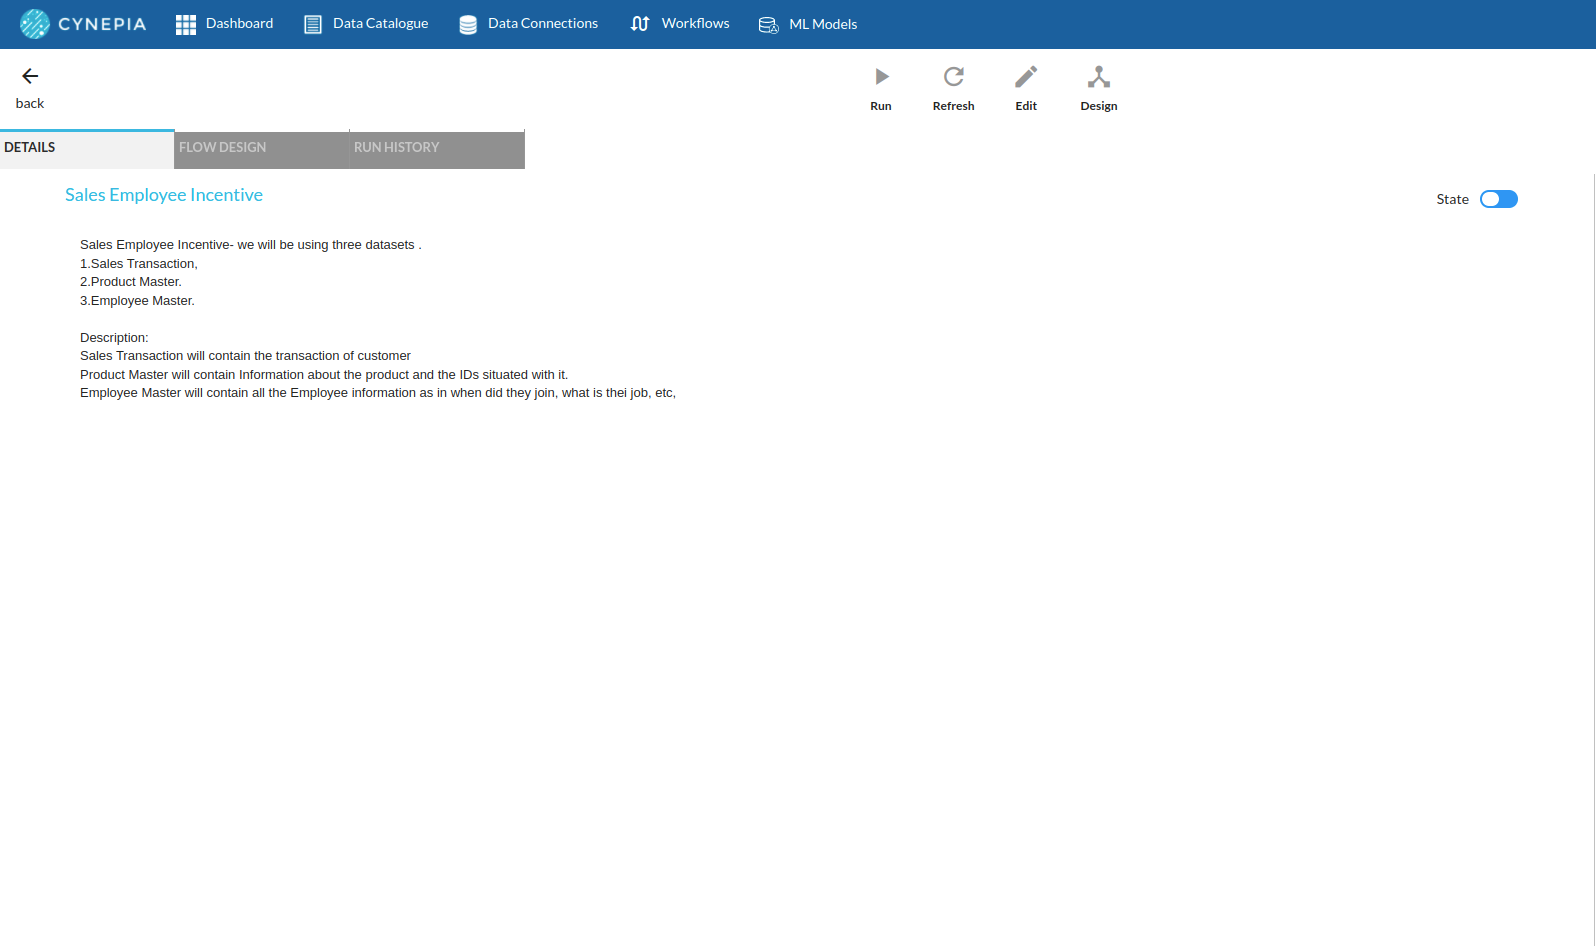
Sales Incentive

What is sales Incentive and why do organisations need it ??
Sales incentives are rewards for sales reps for accomplishing their sales goal. The incentive could be monetary or non-monetary, with the underlying aim being the same: to encourage your sales team to meet their goals. Reasons as to why you need a sales incentive program are :
- Keeps your sales reps fired up to work towards their sales goals
- Improves sales performance
- Close more deals as your team gears toward achieving their incentives
- Improves team loyalty as employees that work hard to earn incentives end up putting more into the business, which makes them loyal to the team
Objective
Numbers prove this: businesses using a sales incentive program report a 79% success rate in reaching their goals by offering the correct reward. The only catch is that making the right sales incentive plan that motivates each team member individually and collaboratively is easier said than done. In this workflow , you will see a proper flow of how a Sales Incentive programs are created and how does Xceed help you with that program creation and execution
Relevance of Xceed
For any template you prepare on your Incentive program you need data to be backed with some proof, there are cases where you will need to analysis of all the incentives given which can state back to years after you have created the program. Xceed will give you a No code environment for storing all the years' data efficiently , Xceed offers you Data catalogue where you can see the previously run incentives which will help you do financial analysis reports, employee performance from previous to present date, If any changes are to be made in your program all you have to do is get inside the Workflow designer and make any changes in your conditions.
Data Requirements
Say, there is a super mart called SORA and that super mart wants to create Incentives for all of it's employees. The datasets required to create an incentive program are as below. In this workflow demonstration , we will be using 3 kinds of data :
- Product Mapping : you can find information about the products being sold in the organisation such as product ID, product name,category and the price for those.
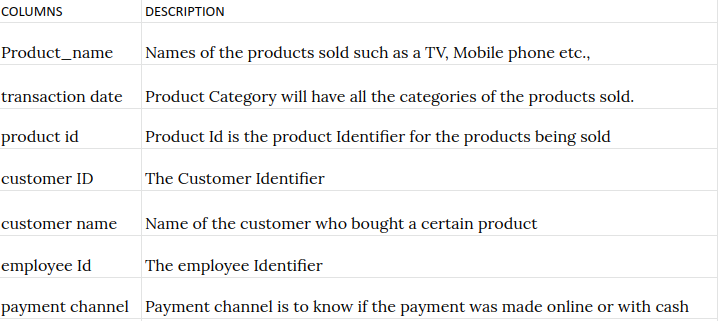
- Sales Transactions data : In sales Transaction Data you can find information about the products sold to customers as in how many were sold, to whom were those products sold and who was the sales employee do completed the sales.
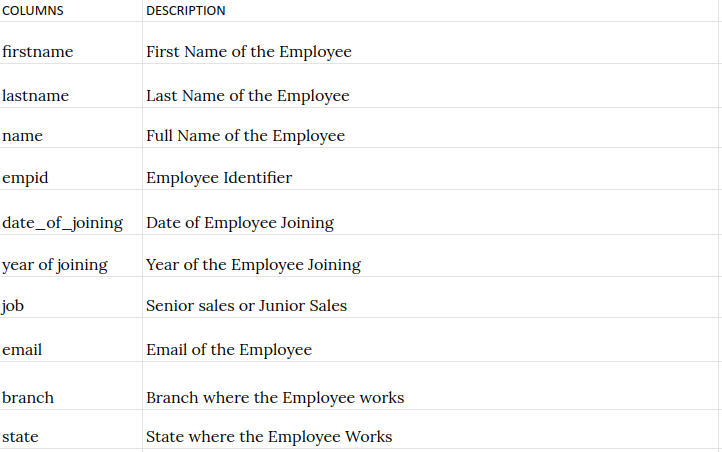
- Employee Master : As the name suggests Employee master is about the employee information as in when did he/she join the organization , their designation and their contact Information.
Columns in each dataset :
Product Master :

Sales Transactions data :
Employee Master :
Output Expectations
For a particular month and the given conditions , You will be able to calculate the Incentive amount to be given to junior sales and senior sales employees . The derived columns necessary to calculate the Incentive are :
- Total Sales done by all employees
- Total Sales done in all categories
- Total Sales done in all products
- Total Number of products sold by each employee
- Total sales amount before 25th of any month
- Total sales amount before 29th of any month
All of these KPIs are required to set the target and rules for the Incentives. After all these KPIs are created we will merge them to the main dataset and start with the rule optimization .
The rules for the optimization
- Junior Sales
- An employee should have sold 400000 rs worth of the products to enter into the Incentive program for that particular month.
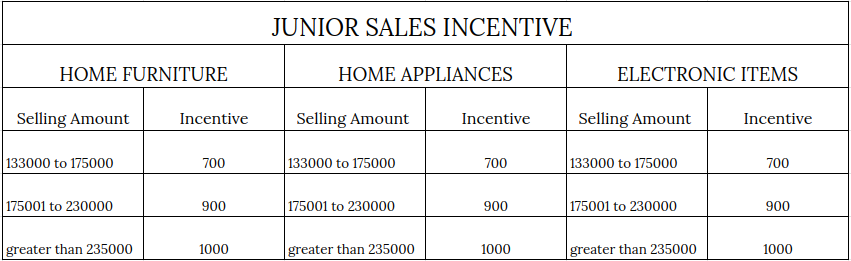
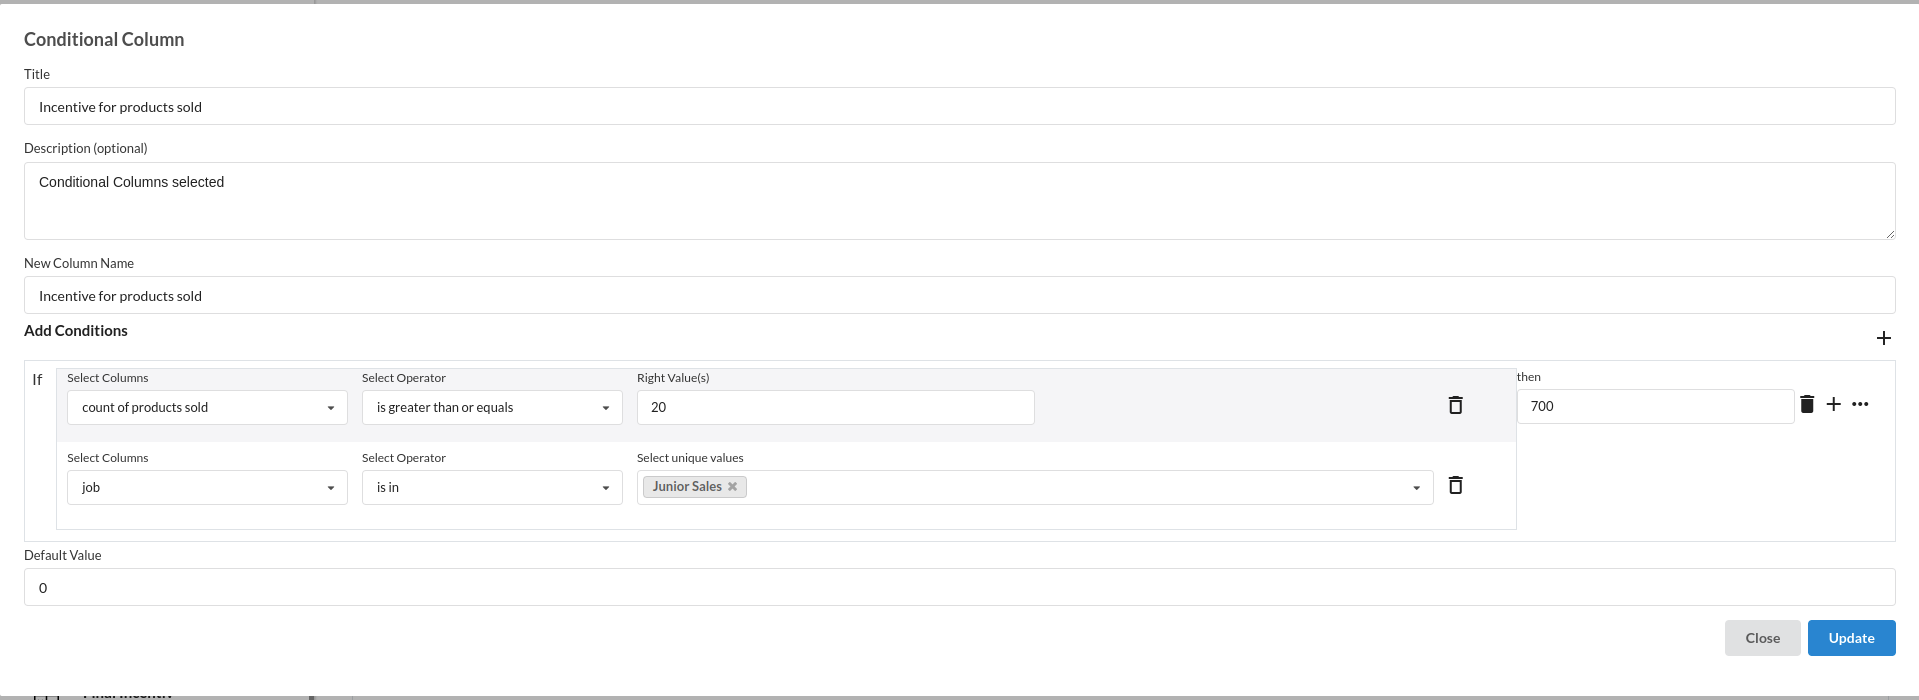
- If the employee sells more than 20 products of any category in that month then he/she will get an incentive of 700.
- There are few rules based on the categories. Those are: An employee should have 133000rs worth sales in each category and those are 1. Home furniture, 2. Home Appliances 3. Electronic Items.
- If the minimum rule for entering incentive program is met before 25th then the employee will get an extra incentive amount of 500.
- If the minimum rule amount is not met by 29th of the month then there then the employee will not be given an incentive.
- If minimum amount is met only in 1 or 2 catgories and not all the categories then the employee will get the incentive of the catgeory where the minimum sales is met.
- Senior Sales
- An employee should have sold 450000 rs worth of the products to enter into the Incentive program for that particular month.
- If the employee sells more than 20 products of any category in that month then he/she will get an incentive of 800.
- There are few rules based on the categories. Those are: An employee should have 165000rs worth sales in each category and those are 1. Home furniture, 2. Home Appliances 3. Electronic Items.
- If the minimum rule for entering incentive program is met before 25th then the employee will get an extra incentive amount of 500
- If the minimum rule amount is not met by 29th of the month then there then the employee will not be given an incentive.
- If minimum amount is met only in 1 or 2 catgories and not all the categories then the employee will get the incentive of the catgeory where the minimum sales is met

Basic flow
- Upload the data to Xceed Analytics and create a dataset
- Create the Workflow for the experiment
- Perform initial exploration of data columns.
- Perform Cleanup and Transform operations
Upload The data to Xceed Analytics and create a dataset
-
Upload all the datasets to Xceed Analytics from the Data Connections Page. For more information on Data Connections refer to Data Connectors
-
Create all the datasets under data catalogue from the uploaded datasource. For more information on how to create a dataset, refer to Data Catalogue
Create a Worfklow/Experiment
- Go to the Workflows Tab on the Navigation and Create our first Regression Experiment/Workflow. For more information on how to create a workflow, refer to Create Workflow
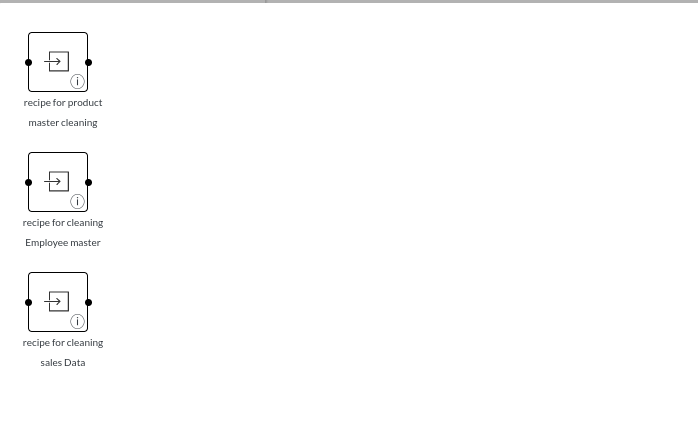
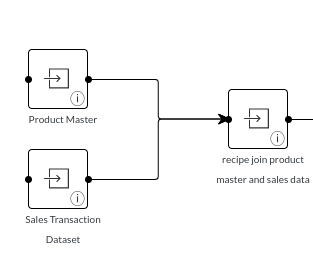
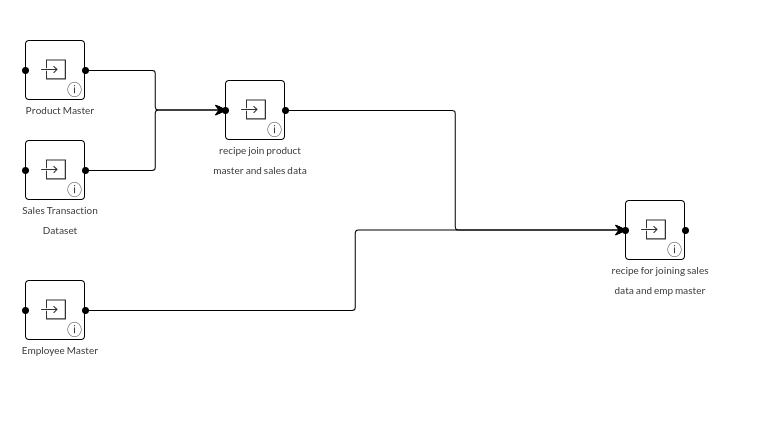
- Create three different recipes for all the datasets to clean them seperately and joing them back again for the final recipe.The recipe flow when you create three datasets inside the workflow designer would look like the one below. For more information, refer to Workflow Designer Main Page
Perform Initial exploration of all columns
Take a vague look at all the datasets
- Product Master

- Sales Transaction Data

- Employee Master

Perform Cleanup and Transform operations
Since there are three recipes which have three different dataset, you should clean them seperately . Take Product Master and start cleaning .
Steps Involved in cleaning product Master are :
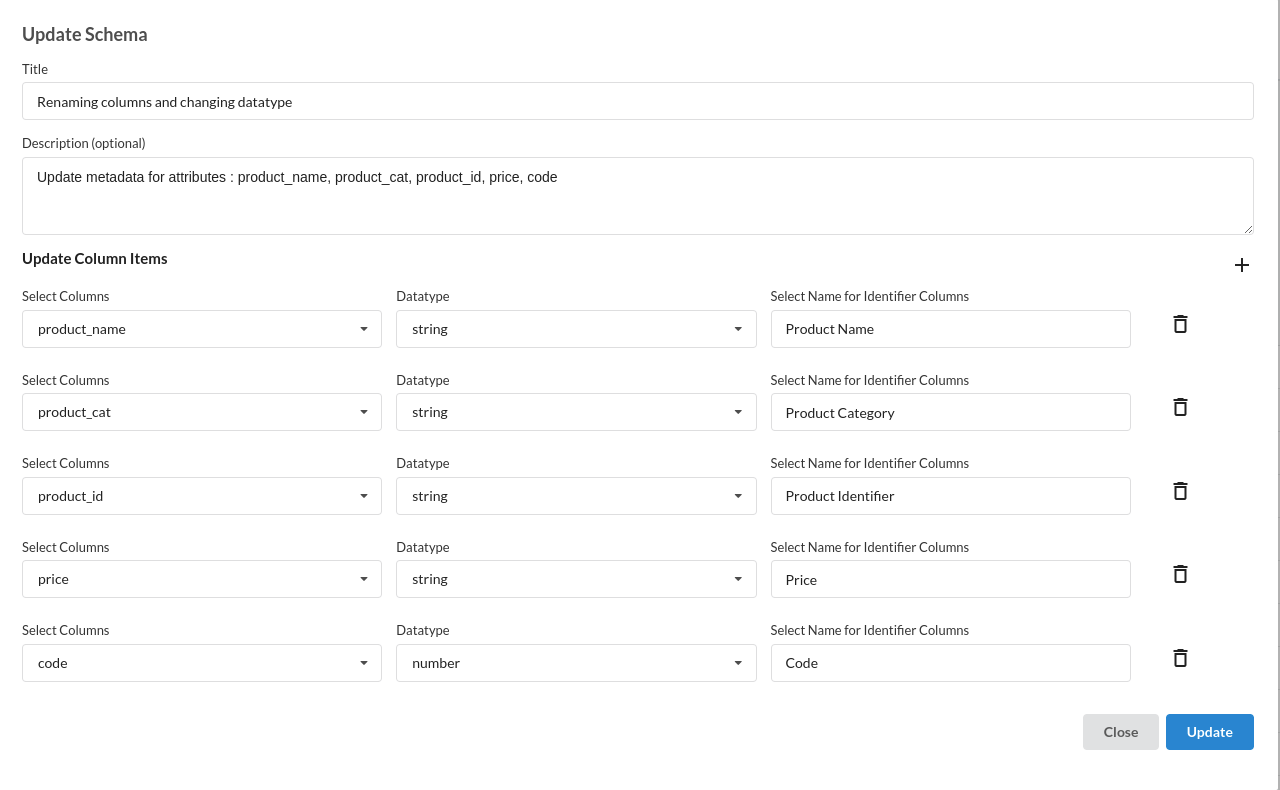
- Update Schema: Rename the columns to proper naming conventions for better understanding.
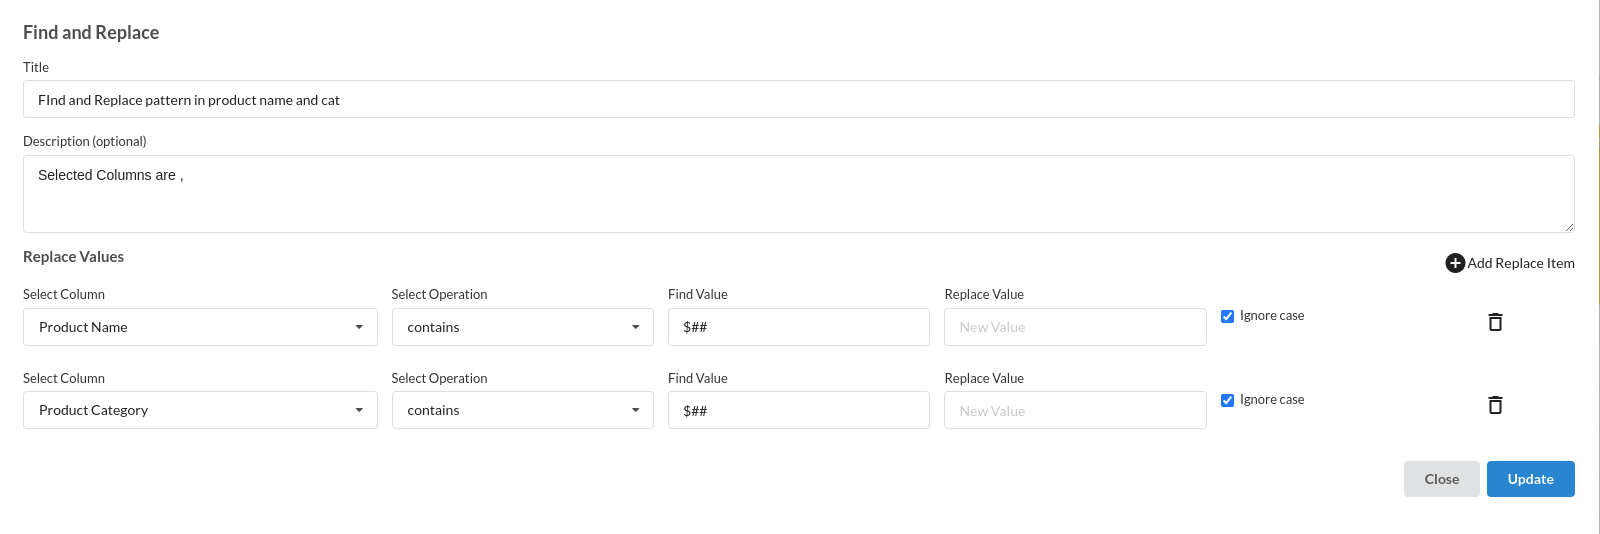
- Find and replace : with just a glance at the dataset or when you go to columns and click on the product Name or Product Category columns , you will see characters like $## .
- Extract Substrings : Go to columns and click on Product Identifier. you will see it has null values . Since Product Identifier is important for any workflow, it is better to fill them or create another one. To create another product Identifier you will be needing two columns called Product Name and Code . extracting first few elements of both the columns is the first step.
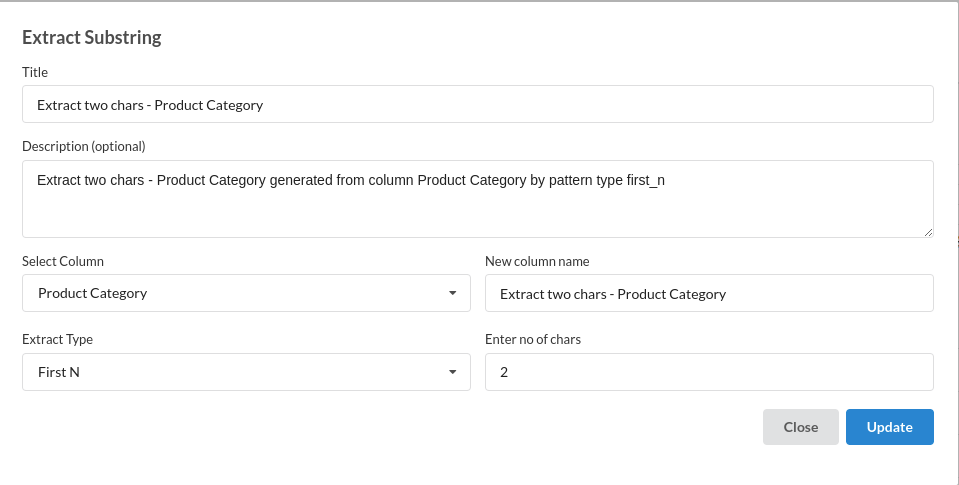
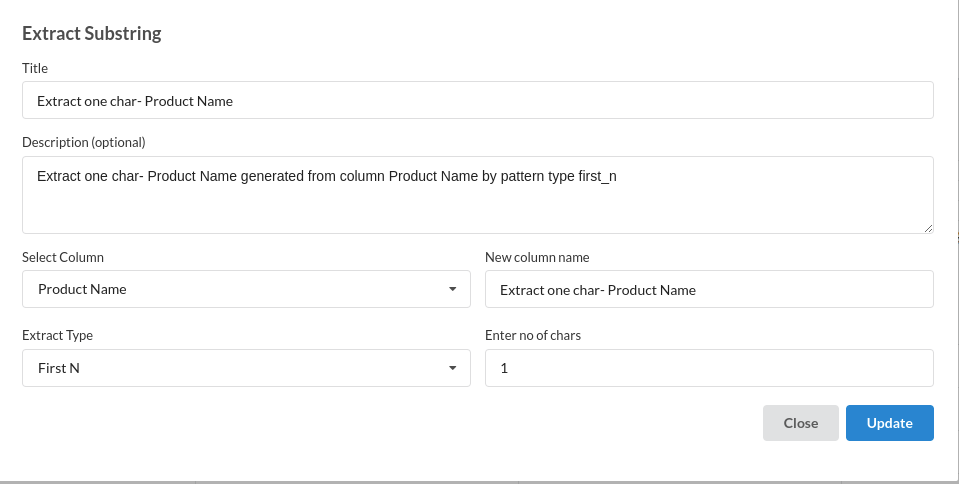
Here you can see we have extracted first 2 characters from product category and 1 character from Product Identifier. For more information on this processor, refer to
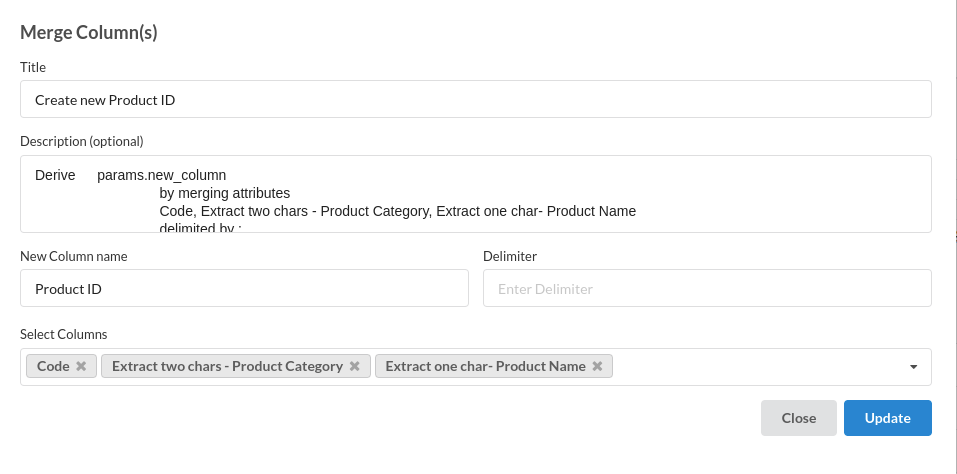
- Merge columns : you now have extracted all the characters necessary from product category, product identifier . Now the the last step is to merge these columns with another column called code which will create the new product Identifier.
The new product ID after extractig and merging the columns would look like the one below
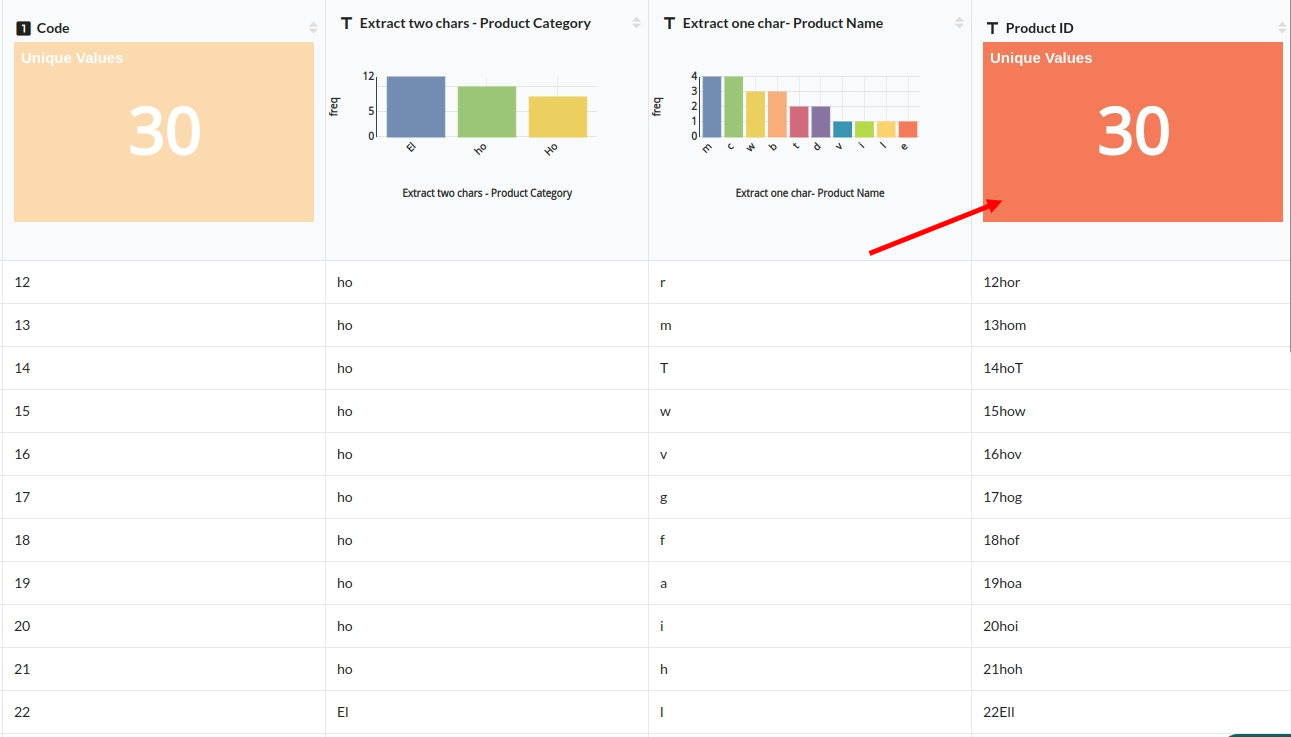
refer merge columns and extract substrings for more information.
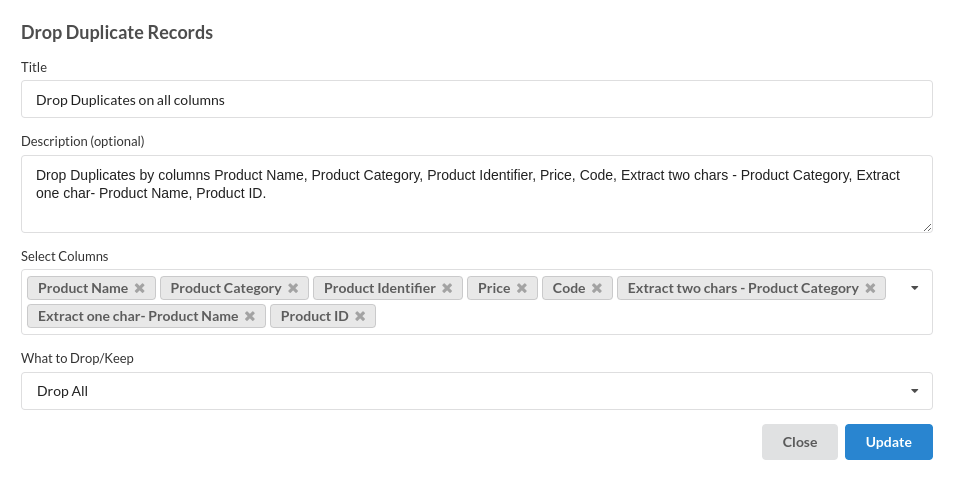
- Drop Duplicates : Go to columns section and click on any Product Category , you will see there are multiple catgeories with the same name . Since This is product Master cleaning it has to be unique. refer drop duplicates for more information
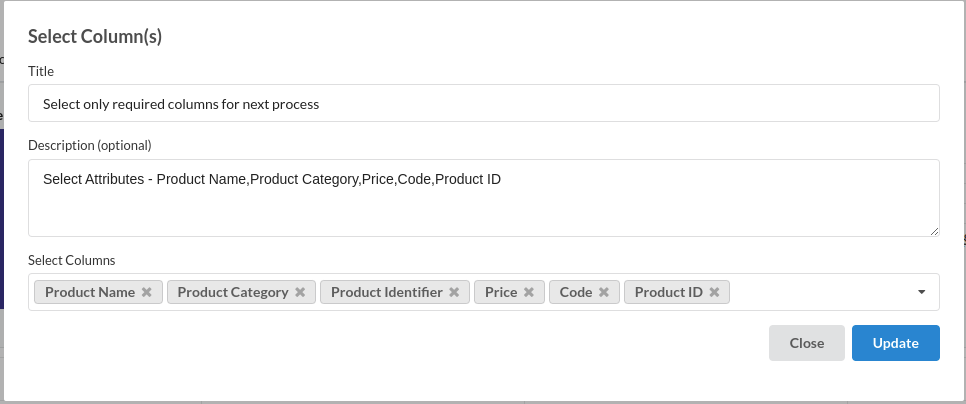
- Select only required columns : there are many unnecessary columns created while cleaning this data. Better to select only which are useful
Steps involved in cleaning Employee Master
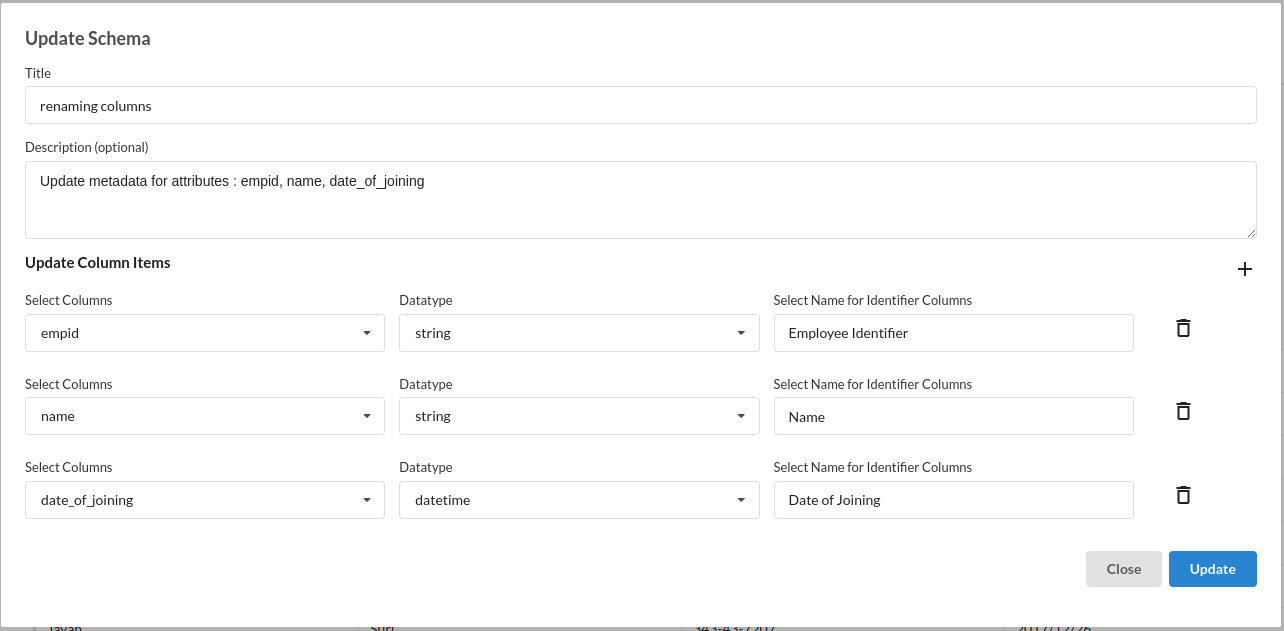
- Update Schema : For better understanding , it is better to rename the columns
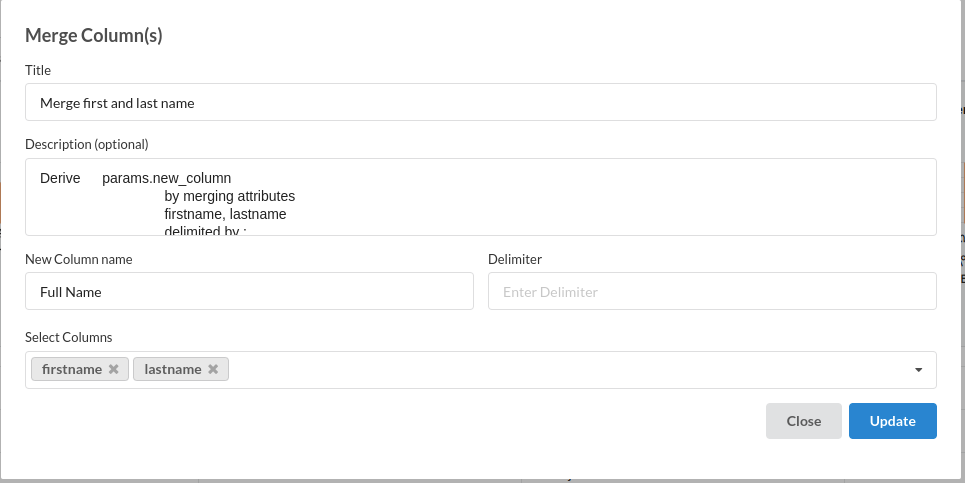
- Merge columns : go to columns sections and click on Name. You will see there are null values in that column. Instead of filling them it is better to create another column by merging firstname and last name.
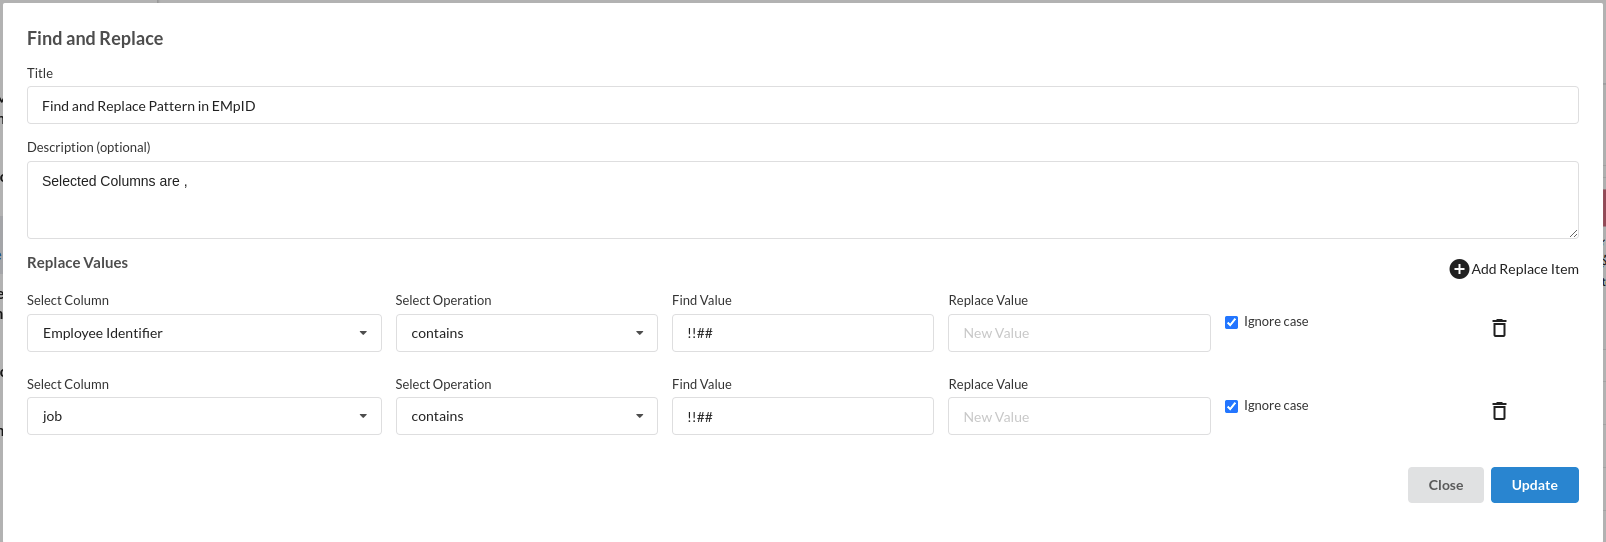
- Find and replace : At a vague glance or in the columns section you can there are characters at the end of the values in Employee Identifier
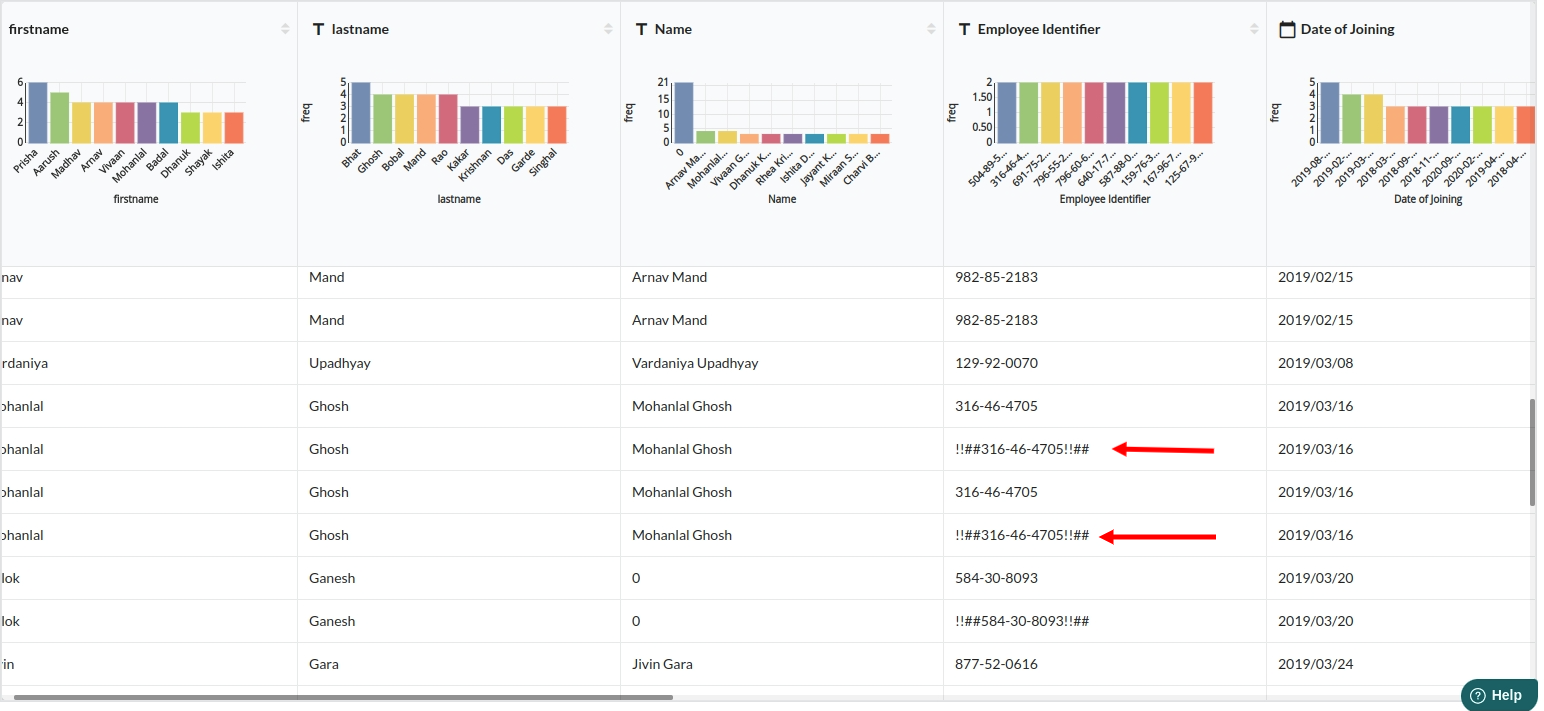
Use Find and Replace to replace all the characters with the empty values
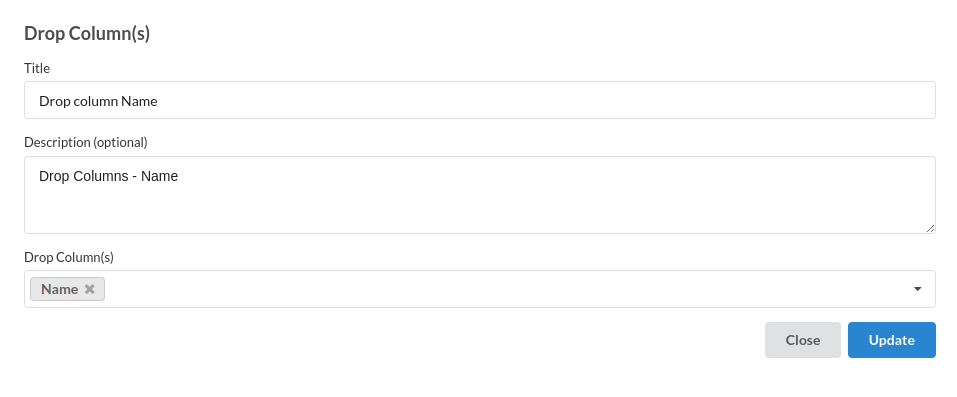
- Drop Columns : Drop the Name since it null values and we have anyways created another column for the same.
Join Sales and Product Master Recipe
join the cleaned product master and sales transaction dataset recipe into one recipe. The Architectural flow would look like the one below. Refer to flow view for more information on this .
The output view inside the joined recipe would look like the one below

The Steps view when you join two recipes would look like the one below

Steps under this recipe
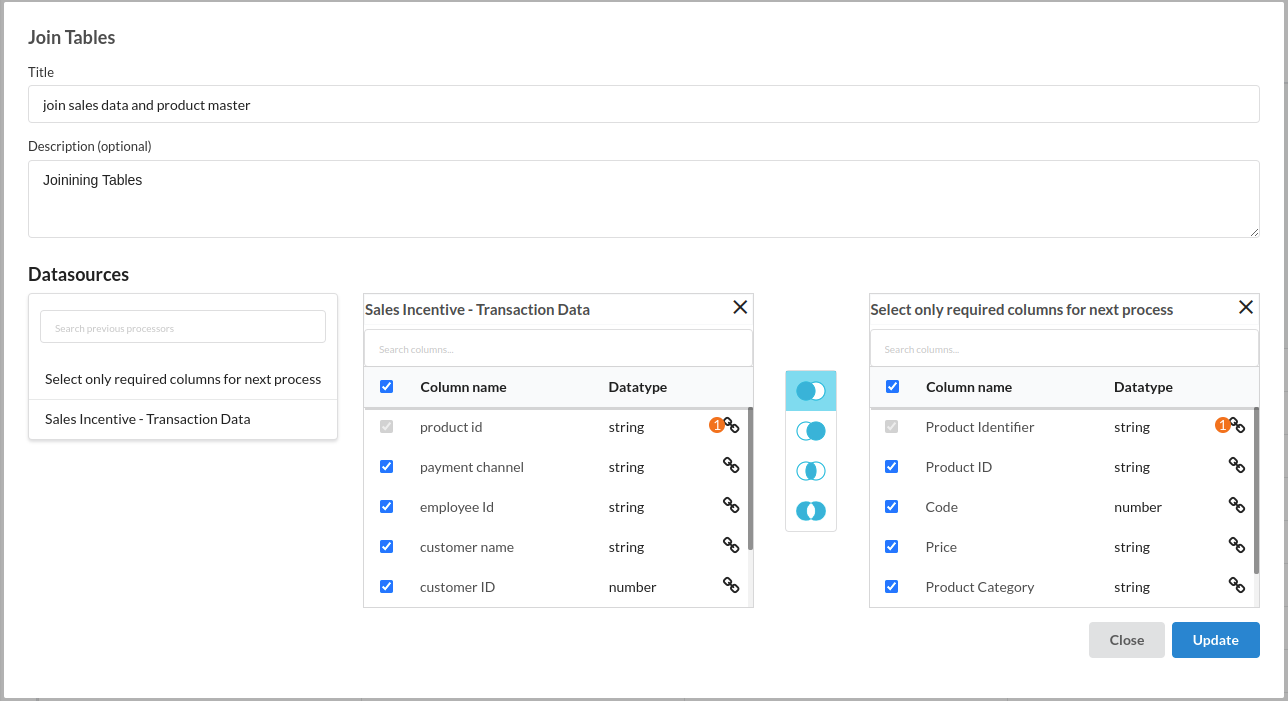
- join Tables : You have product master and sales transaction data infront of you and the one column which is common in both the datasets is Product Identifier.So, do a left join with Product ID as the primary keyy. Refer Join Tablesfor more information on join
The filled step would look like the one below
Create a final recipe joining all the datasets into one
The flow when you join all the datasets into one would look like the one below
steps inside the final view
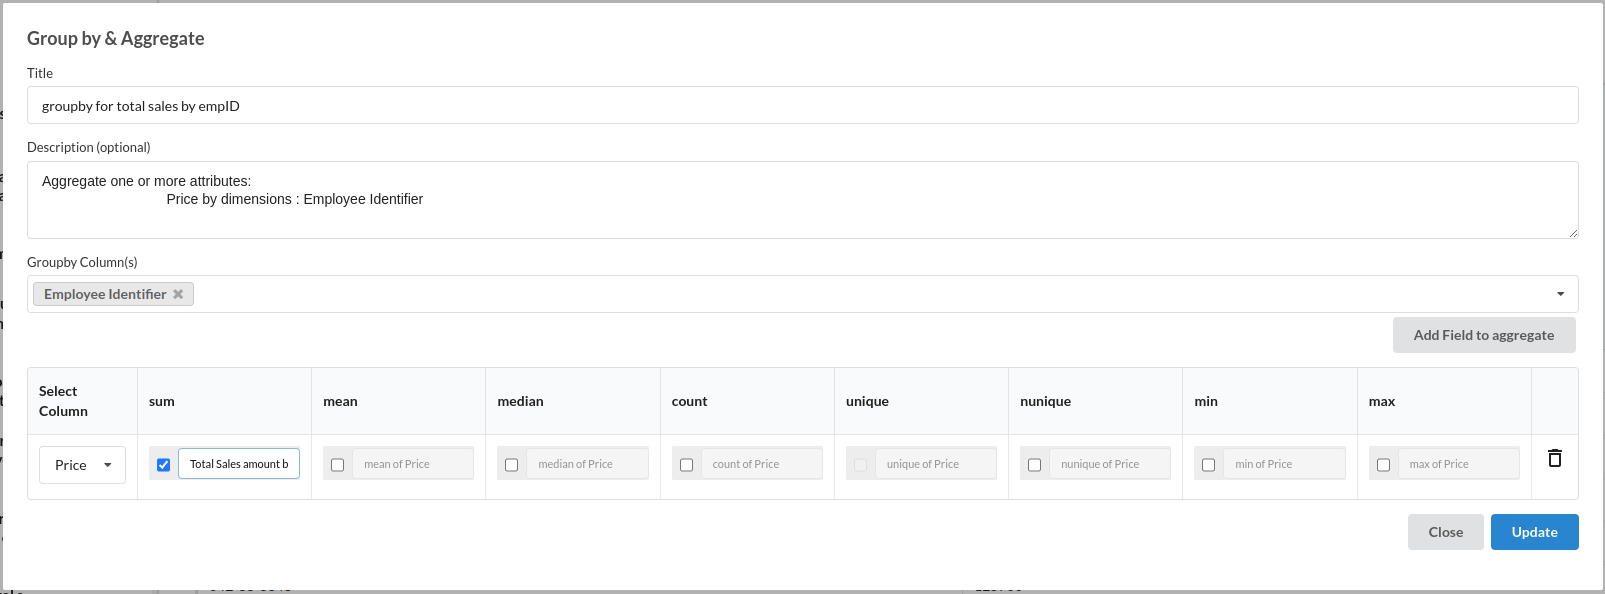
- Groupby and Aggregate and Join Tables: There are few important columns to be created and join back to the main frame before calculating the incentives
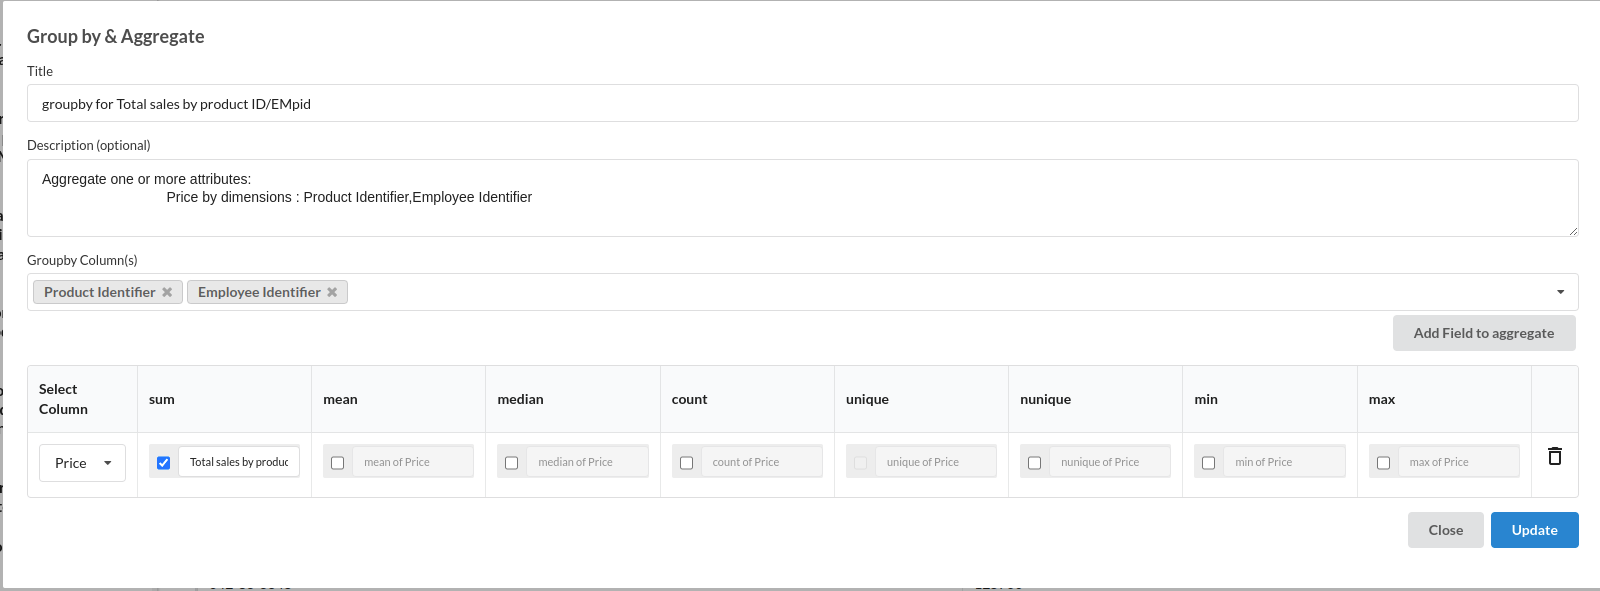
- Total Sales done by all employees: The filled step for this would look like the one below
- Total Sales done in all categories The filled step for this KPI would look like the one below
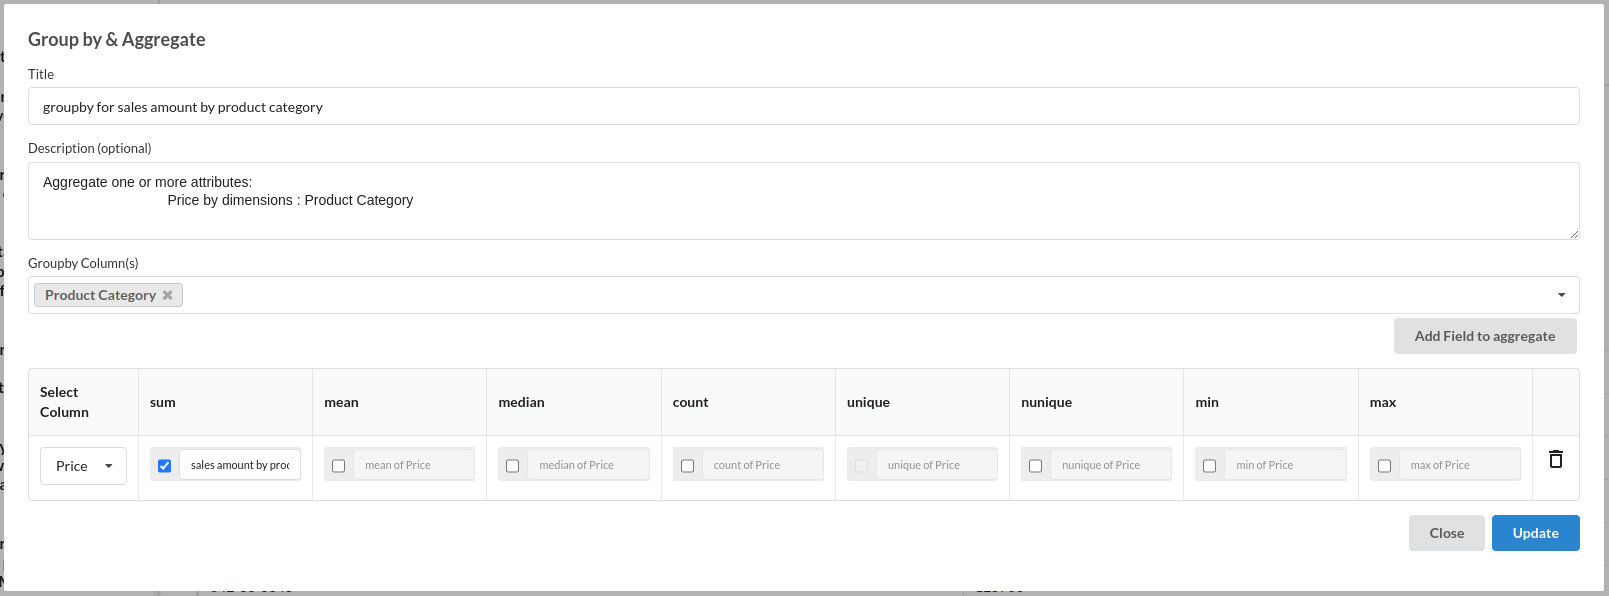
- Total Sales done in all products The filled step for this KPI would look like the one below
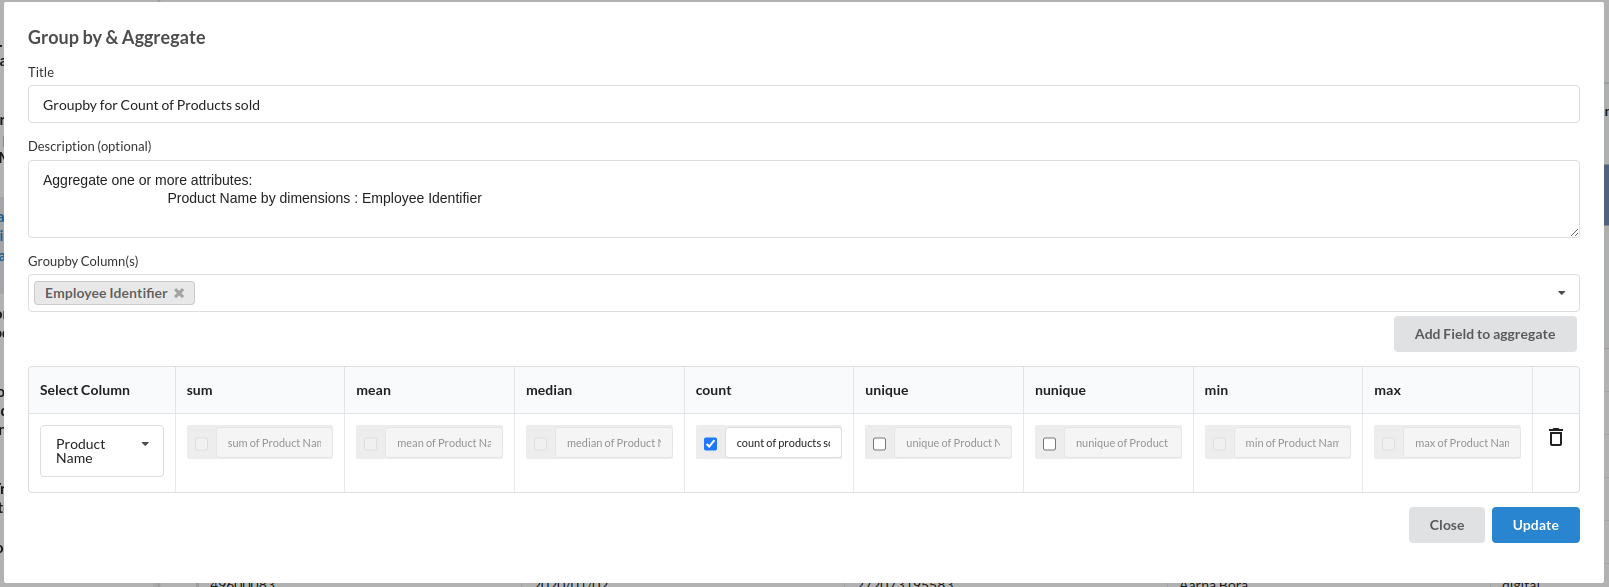
- Total Number of products sold by each employee The filled step for this KPI would look like the one below
- Total sales amount before 25th and 29th of any month
- Calculate: To get the sales amount before 25th , you will need to extract day from the date column . The filled step would look like the one below
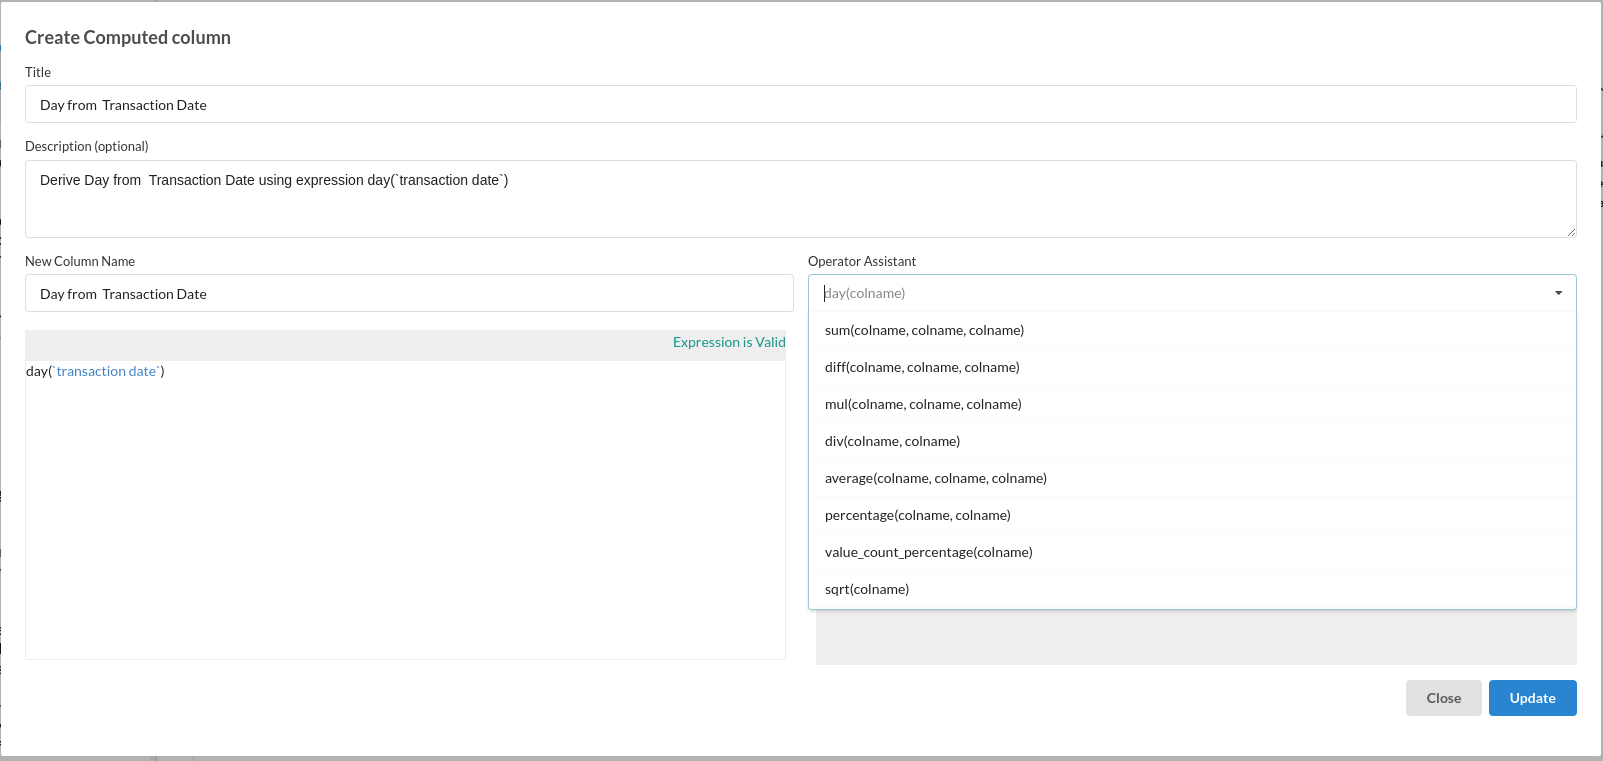
To extract day we used calculate processor . Refer day from date in Calculate for more information on this processor.
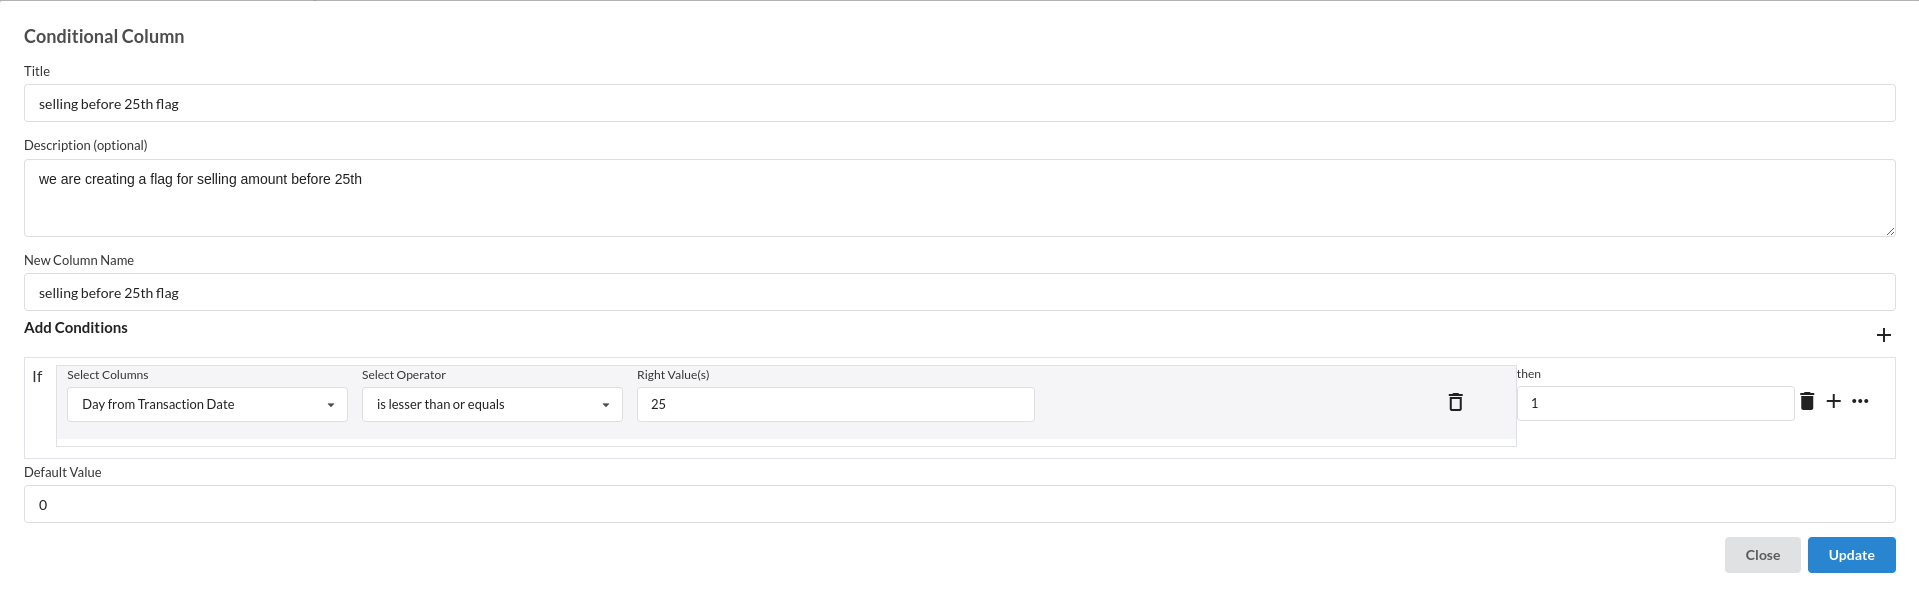
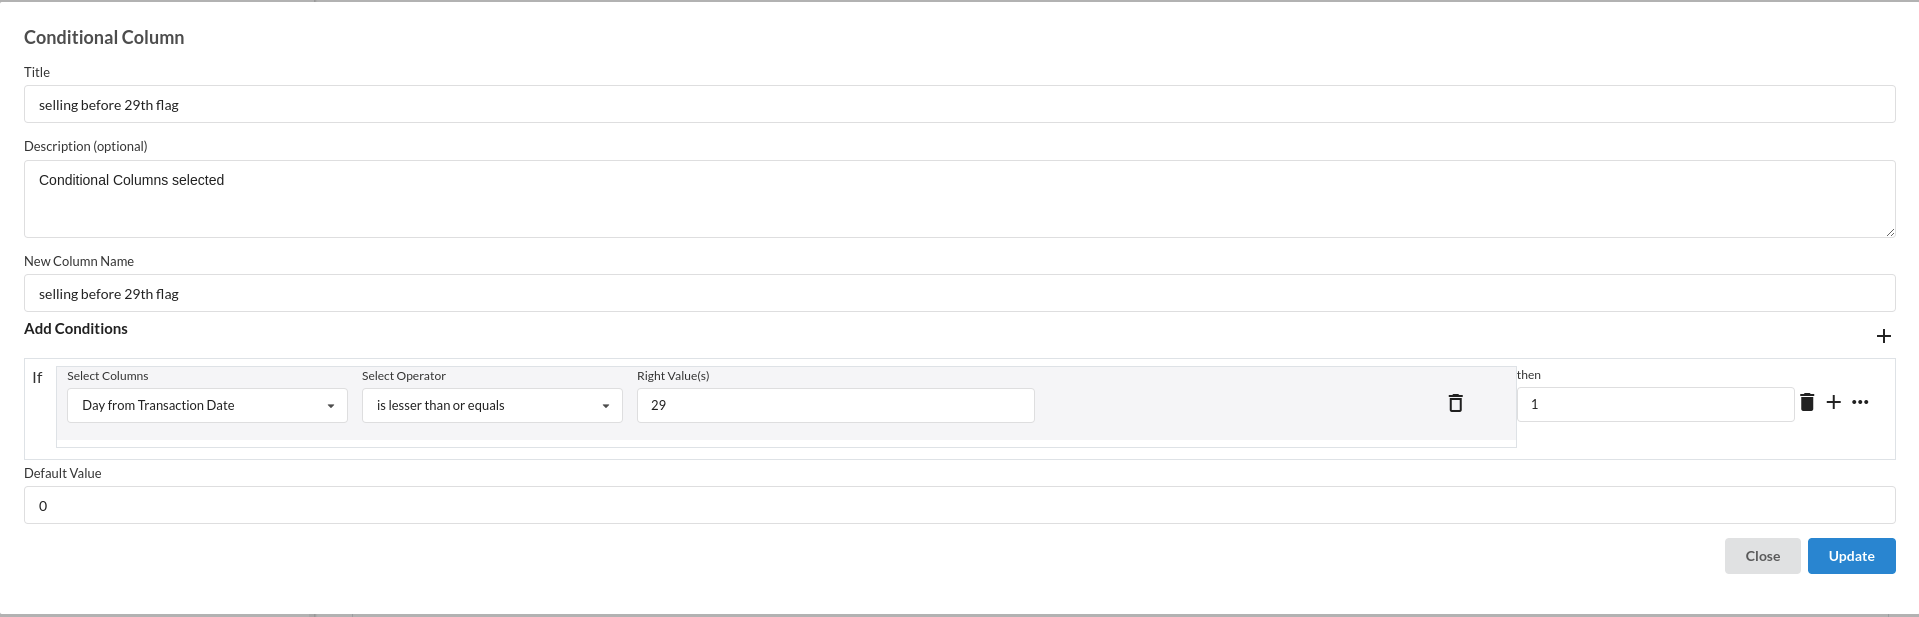
- Conditional Column: Now that we have extracted the day from the transaction date, we need to create two flag columns which will indicate 1 if the date is 25th of before and 0 if it is greater than 25th. The same goes for 29th. We will be using conditional column processor for this step. Refer Conditional Column for more information on this processor.
After creating the flag columns, we need to get the total sales on both of these dates. for that we need to use:
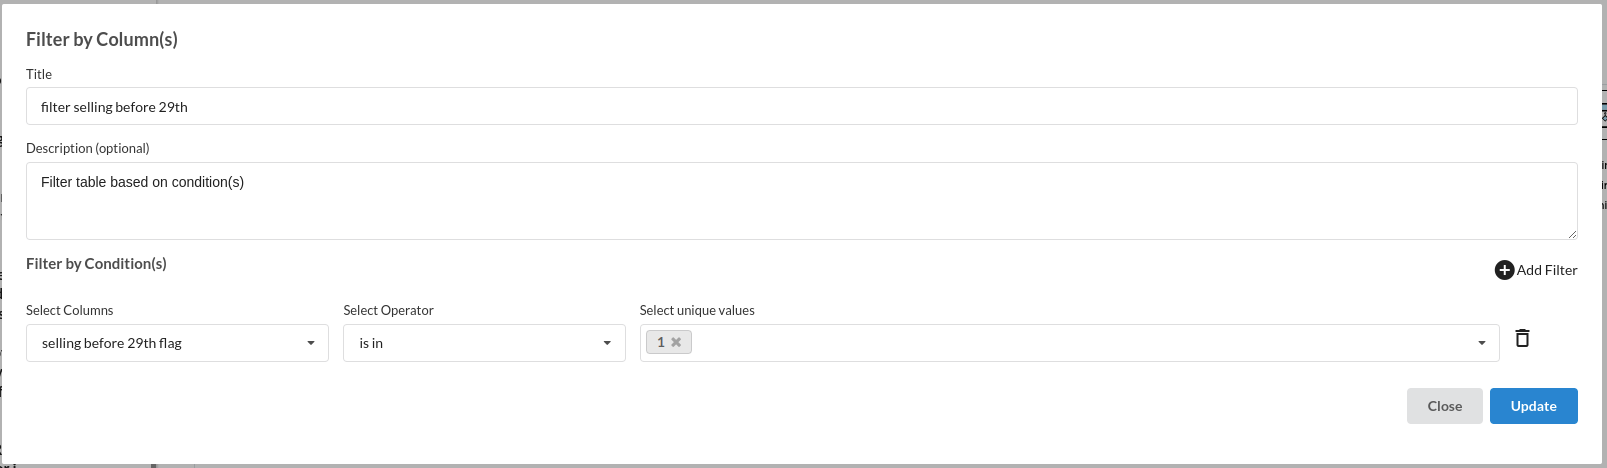
- Filter :
Filter by the 25th flag column where the value is in 1 . This helps us in getting the total sales before 25th and join it back to the mainframe.

Filter by the 29th flag column where the value is in 1 . This helps us in getting the total sales before 29th and join it back to the mainframe.
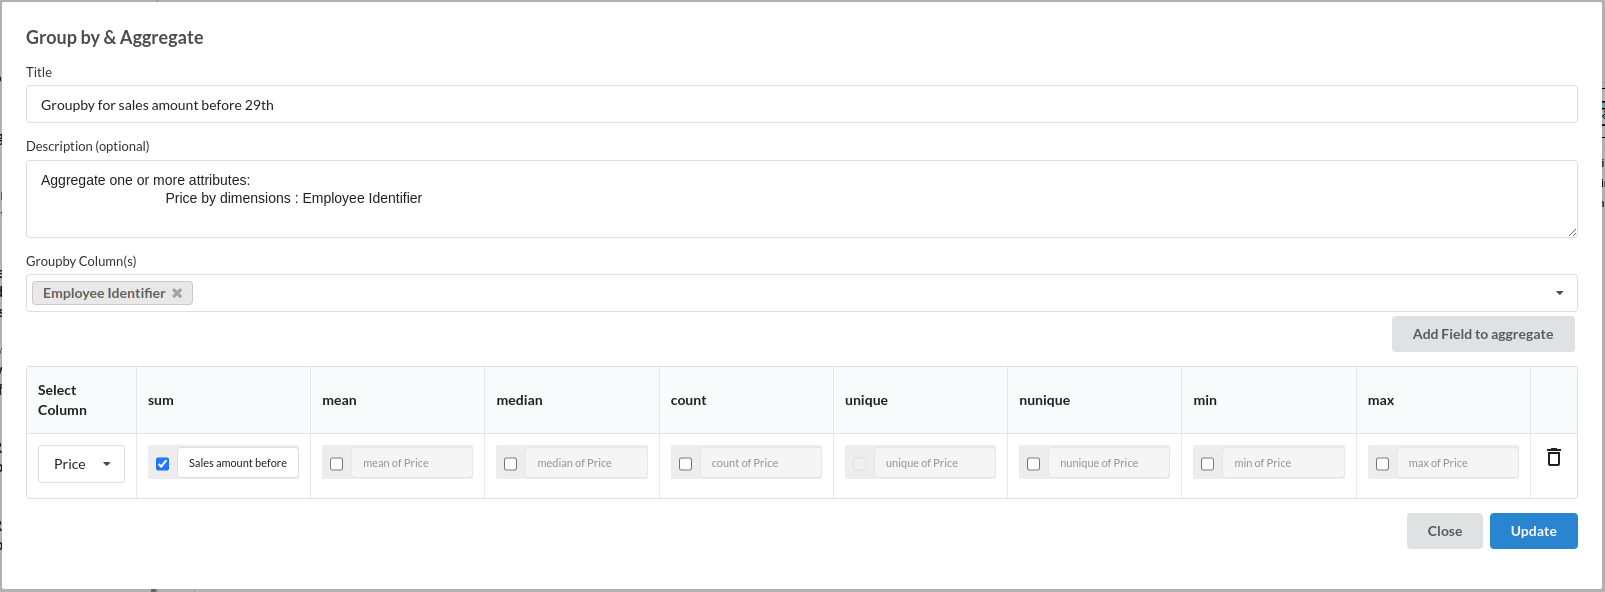
- Groupby And Aggregate Get the total sales done by each employee before 25th.

Get the total sales done by each employee before 29th. for more information on this processor , refer to Groupby and Aggregate
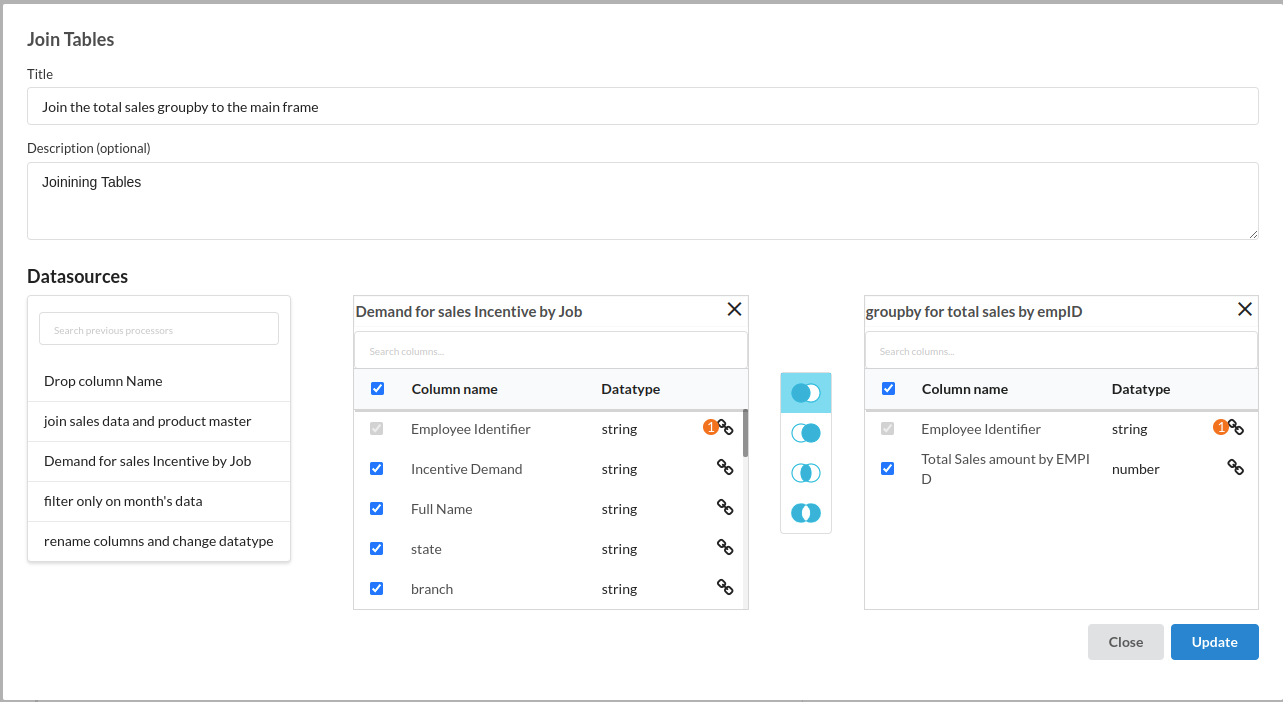
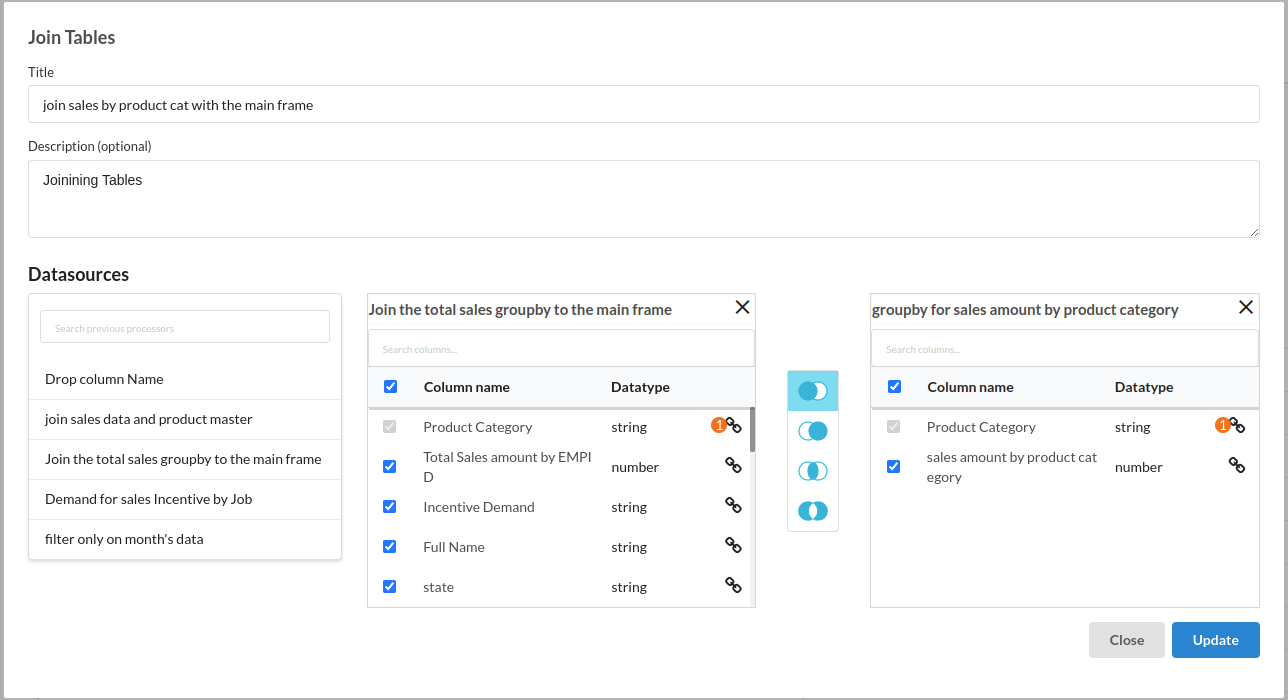
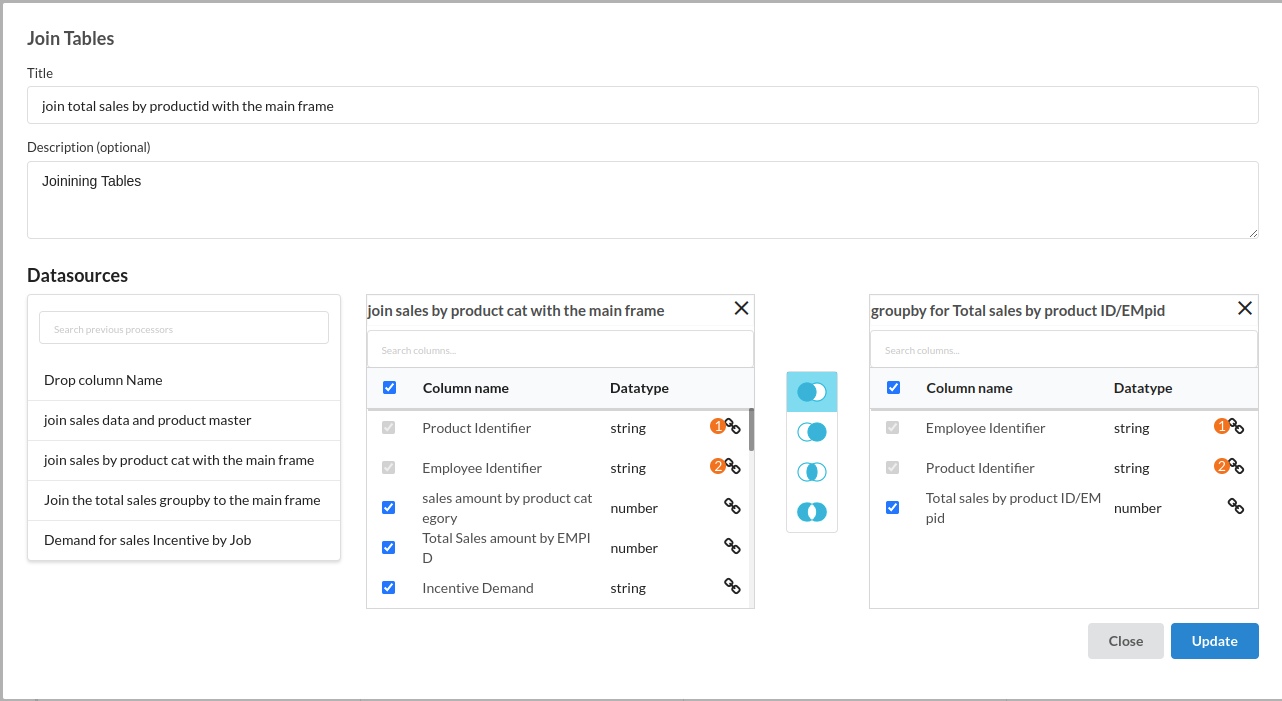
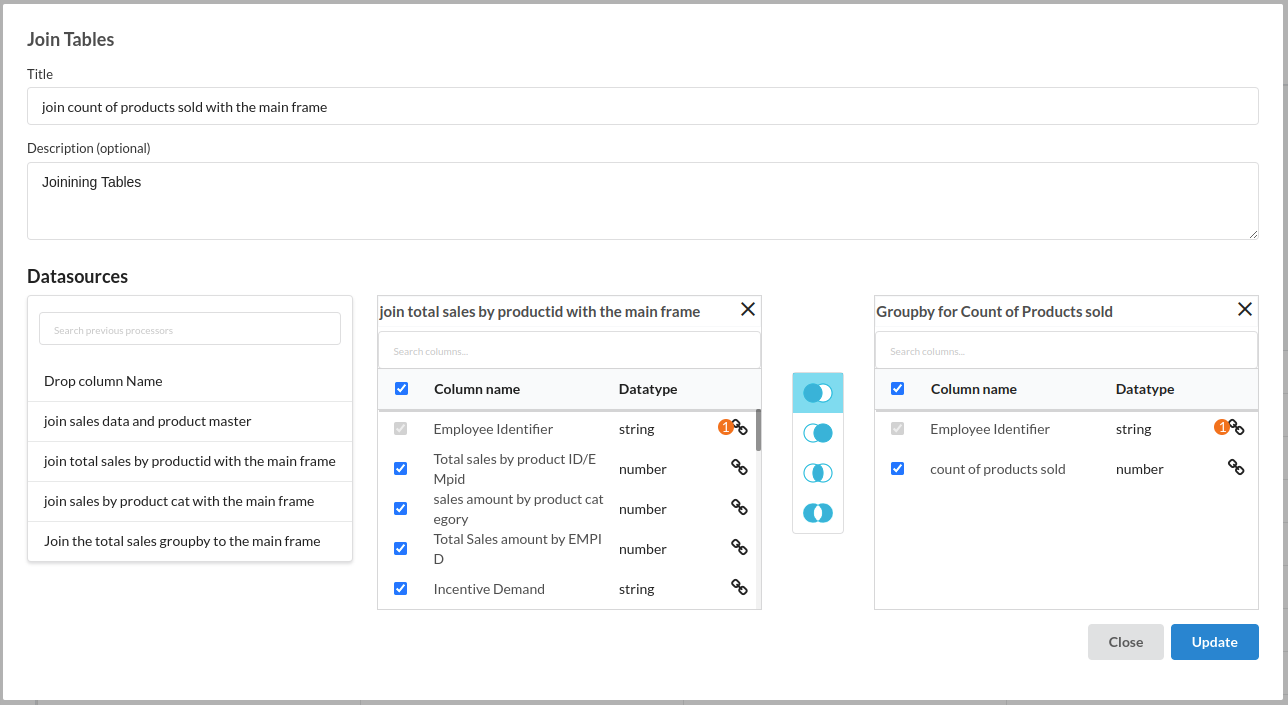
- Join Tables
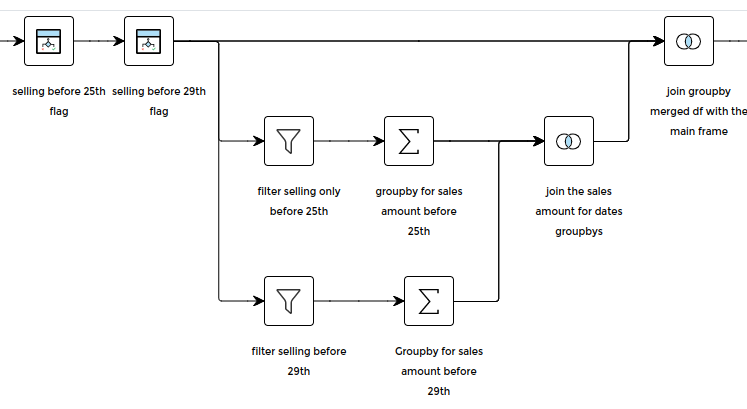
Join both the groupby and aggregate steps and join it back to the main frame. The flow of the whole filter, groupby and join would look like the one below.
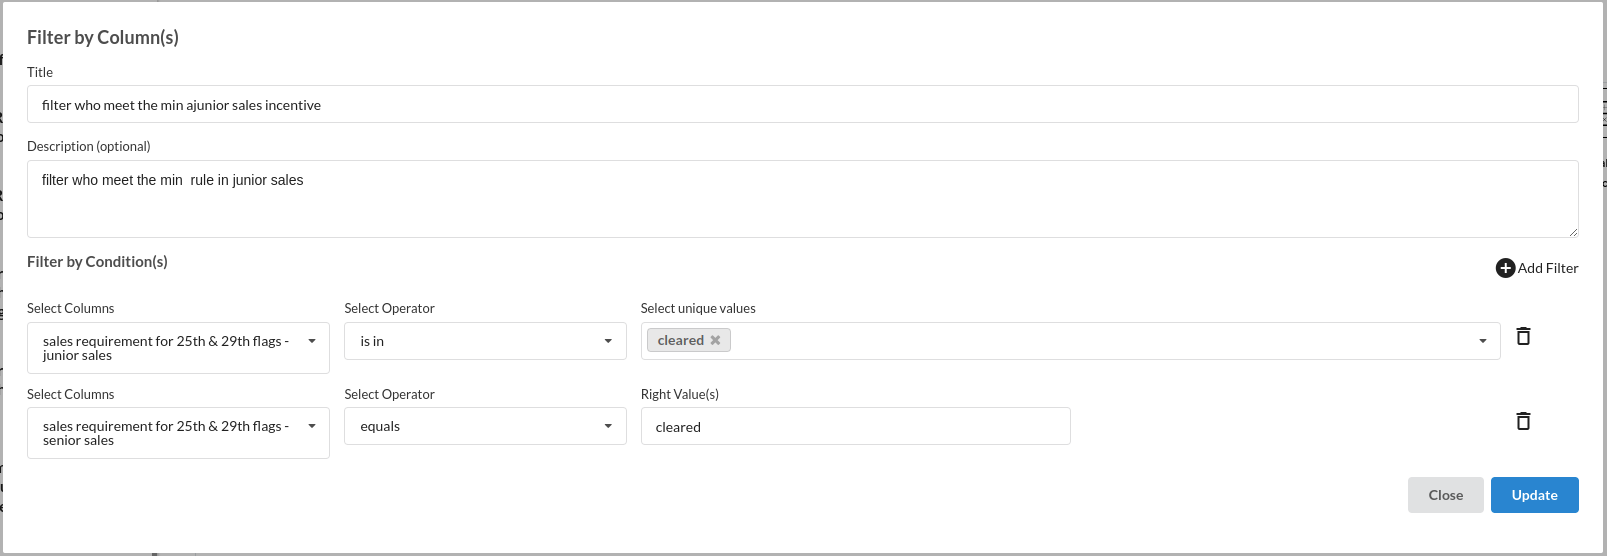
- Minimum Requirement Flag
- Conditional Column :
Take Total sales by employee and check if the minimum requirement is matching for the junior sales. if it matches then the value is clear , if not the value is going to be not cleared.The filled step would look like the one below

Take Total sales by employee and check if the minimum requirement is matching for the senior sales. If it matches then the value is clear , if not the value is going to be not cleated. The filled step would look like the below

- Total Requirement Flag
Take the total sales of 25th and 29th and check if all the employees of the junior sales designation meet the criteria or not. if they meet the criteria then the value is going to be cleared. If not the value is going to be not cleared. The filled step would look like the one below.

Do the same for Senior sales.
- Filter : filter only the ones that have fulfilled the requirement using filter processor . Refer filter for more information on this processor. The filled step would look like the one below
The dataset until this point would look like the one below

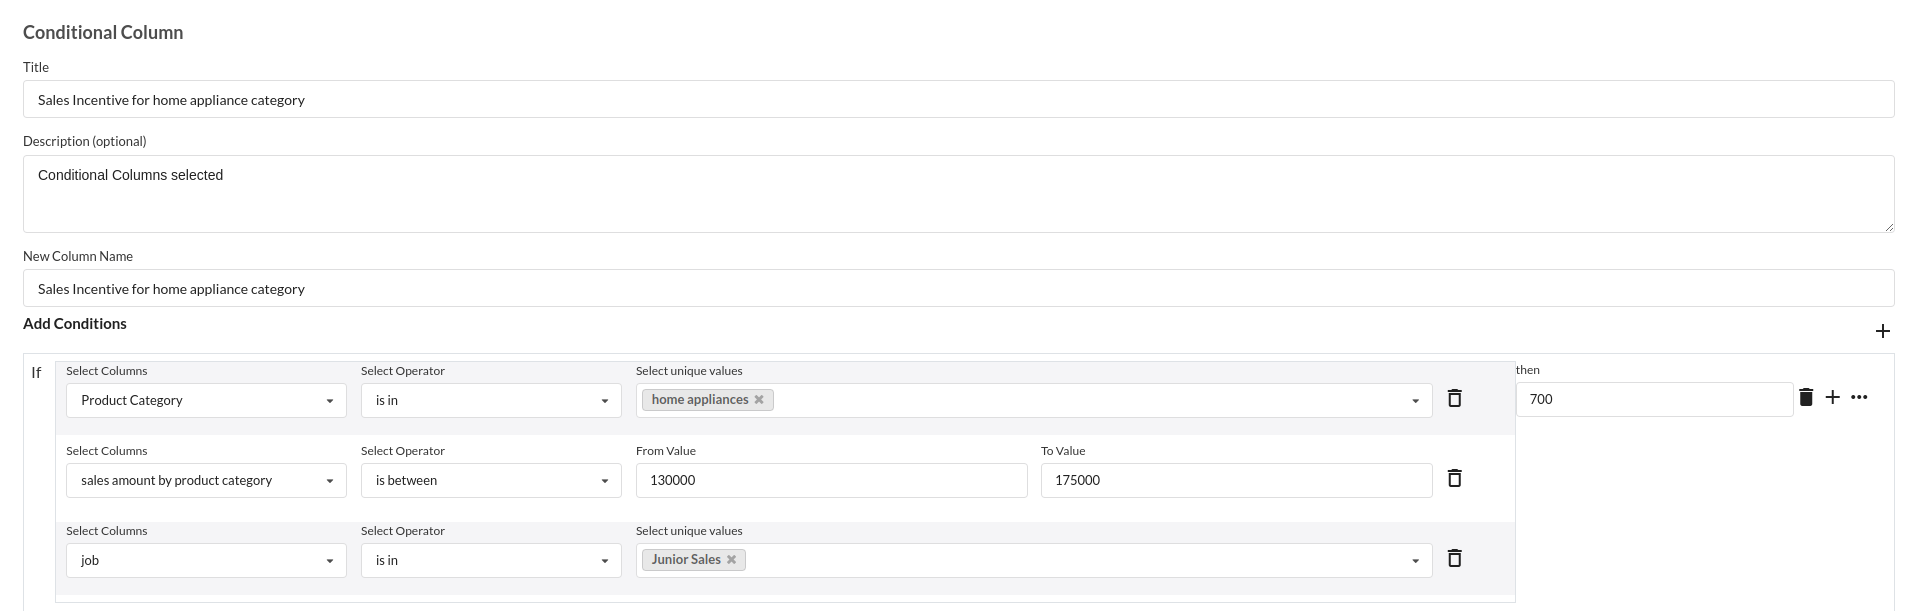
- Conditional Column : Now that we have filtered out only the ones that have fulfilled all the requirements for the incentive. It is now time to create all the incentive columns.
We will be creating all the incentive columns based on the three products available.
- Home appliance Incentive step would look like the one below
Break these into three segments of all the levels of incentives under Home appliance category


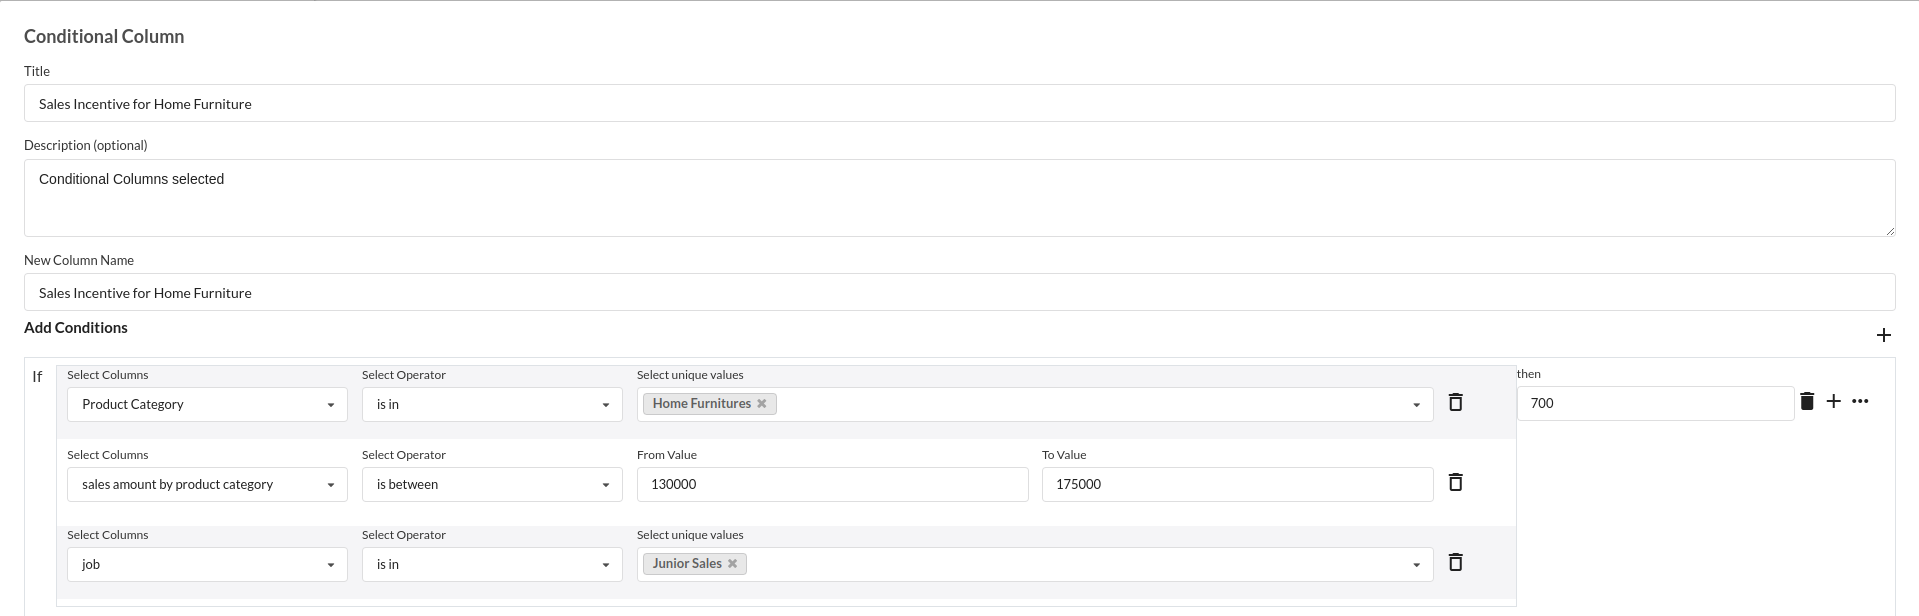
- Home Furniture Incentive step would look like the one below
Break these into three segments of all the levels of incentives under Home Furniture category


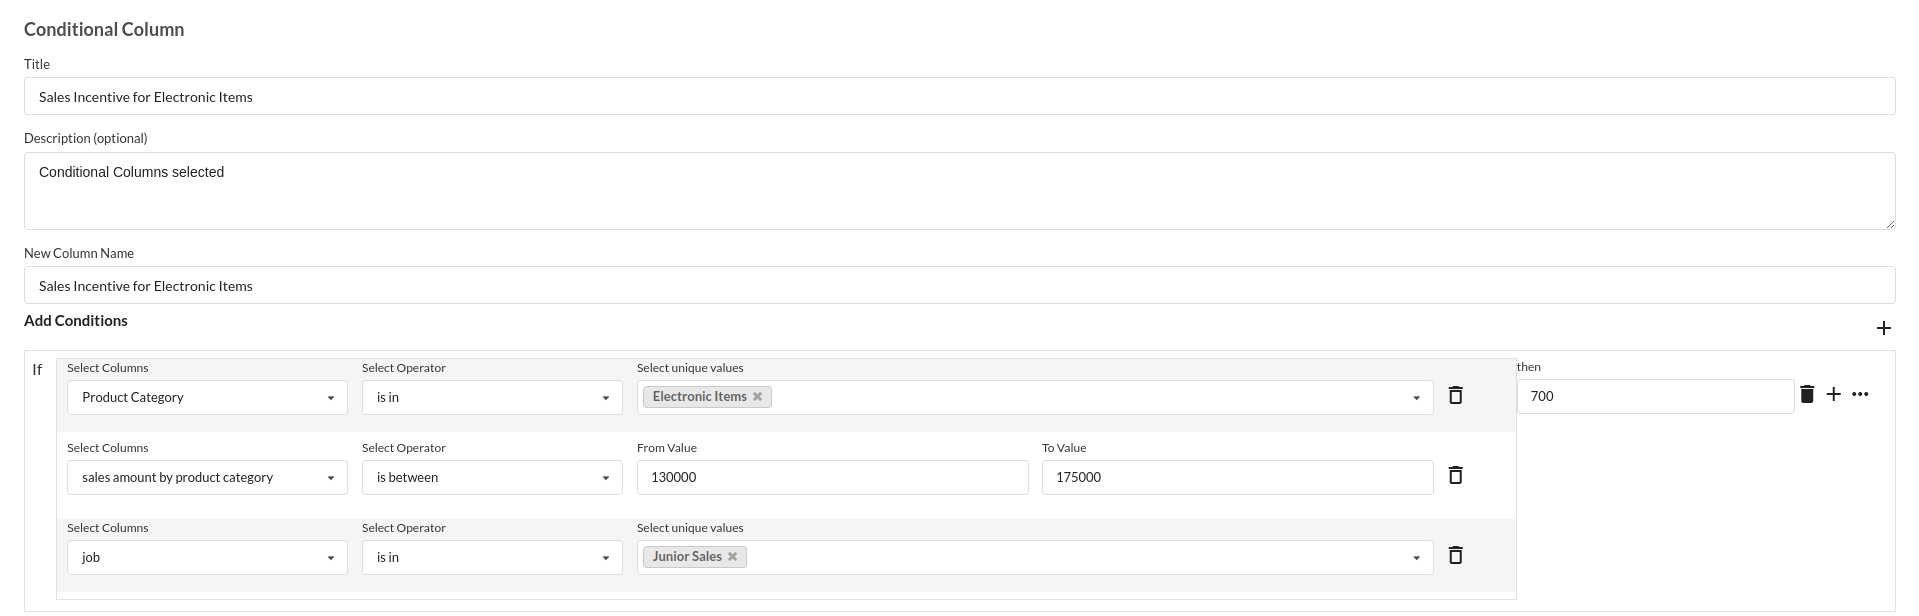
- Electronic Items Incentive step would look like the one below
Break these into three segments of all the levels of incentives under Electronic Items category


The same kind of steps can be done for senior sales by just changing the column job's value to senior sales
- Incentives for number of products sold
The filled step would look like the one below
- Calculate : The left out steps right now is to add up all the incentive columns
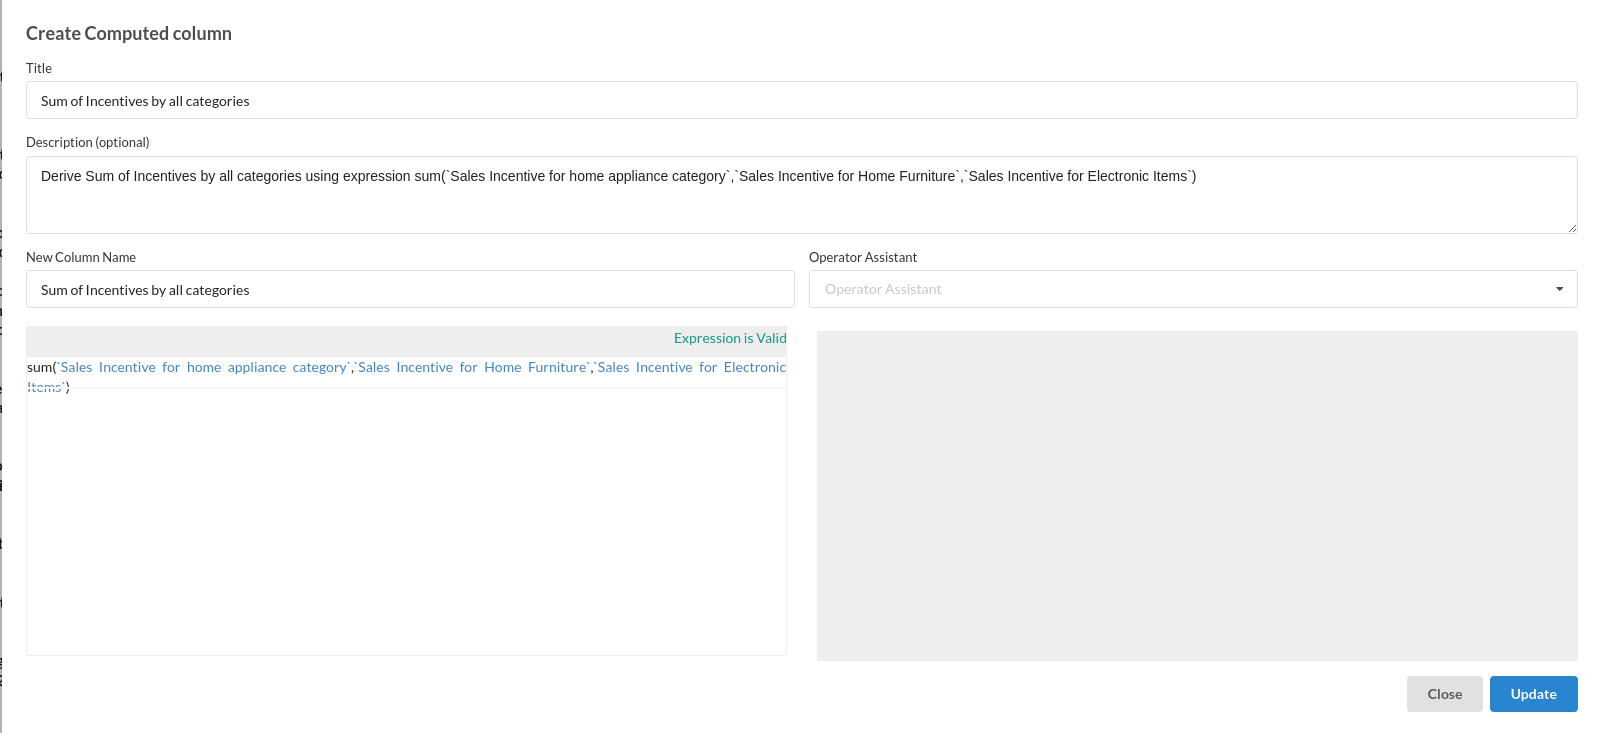
After creating all the columns your dataset will look like the one below
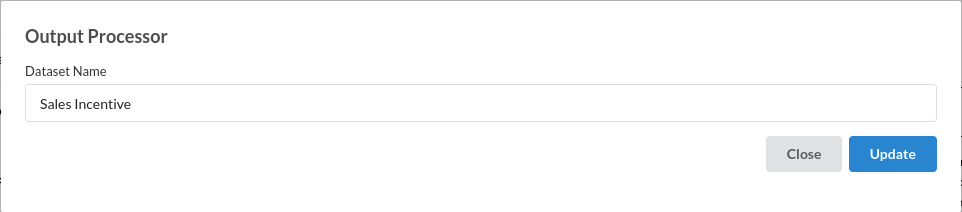
- Ouput Processor: At the last step, which is the sum of all the incentives , you can create an output to view this dataset outside of the workflow designer in the data catalogue. The filled step would look like the one below